
Lesson 5 : How to rig a character's body
In this course, we'll learn how to create a character's body rig.
We'll look at all the steps involved in making a Rig for a humanoid character. We'll see how to place the maids, how to place the controllers and how to make Ik FK systems easily. In this course we'll be focusing mainly on the limbs and torso, and we'll also take a quick look at how to make basic hands and feet.
n this course, we won't be using Maya constraints or only very minimally, In this course, we will only use matrix constraints.
Table of Contents
1. How to place bones
2. How to make the trunk of the body
3. Make an IK FK system switch
4. Make a basic hand / feet
5. Link everything
6. Which joint should I Skinner
7. Source
1. How to place bones
This course will introduce you to the basics of creating a character rig that will be easy to use and will allow you to do quite a few things with it. It is the beginning of a series of courses that will teach you how to create a character from A to Z. We will start by creating a simple character, and then lesson by lesson, we will cover each part of the body to learn how to make increasingly complex systems. Today, we will start by making a complete but fairly simple character that will already allow you to have a lot of fun.
Before we begin, if you are not familiar with the concept of rigging in the 3D world, I invite you to watch my first lesson on rigging to understand the basic principles.
Even before you start placing your bones and doing anything related to rigging, you need to check the model's topology to see if it will be easily deformable by the rig. For this, I recommend doing some research and watching videos that explain the good and bad topologies to avoid in your 3D models, so that rigging does not become complicated and result in incorrect deformations.
this video is in Japanese but it's easy to understand when you watch it
In the film industry, we tend to use a bone hierarchy in this form, which constitutes the entire human body. All these bones represent the totality of human bones. We do not need to represent every bone in the body because we are aiming to create the main movements of the human body. We do not need to create every bone in the body to be able to deform our character.


There is also an alternative where the limbs are not directly connected to the main trunk.


The positioning of the joints is not done randomly, and there are rules to follow. Whether it is for the spine, the limbs, or by extension the feet and hands. For realistic rules, you need to precisely respect the placement of the joints of the bones in reality to know where to place the bones in your rig. Therefore, I recommend that you first research how the bones of the human body are positioned and how they move relative to each other.
For more videos, watch this channel
For this lesson, we will use a man's body with this bone structure.


To start the rig, we will begin by placing the joints. We will position them according to certain proportions relative to the volume of the character. For example, when dealing with limbs, we need to maintain a ratio of 2/3 or 2/5 for positioning the bones according to the joints. For instance, if we want to place the bones for an arm, we will place the first shoulder joint by drawing a line from under the armpit to the end of the clavicle. Then we will take 2/3 or 2/5 of this line and place the joint there.


I place the joint at 2/3 of the way along and in the middle in terms of thickness. I make sure that the joint is well oriented.

Attention, I remind you to properly orient your joint in the correct orientation, meaning that the X-axis should be your primary axis of rotation. This helps avoid Gimbal lock and potential future problems. By convention, we have chosen the X-axis, but it is possible to use the Z-axis; however, I still recommend keeping the X-axis as the primary axis of rotation. Additionally, ensure there is no rotation in the joint orientation. For each joint, the joint orientation should be set to 0, 0, 0.
The 2/3 and 2/5 technique will indeed be the main technique for placing all the joints. Continuing with the elbow, we will do exactly the same thing: draw a line between the cubital fossa and the elbow, and place the joint for the elbow at approximately two-fifths along this line.


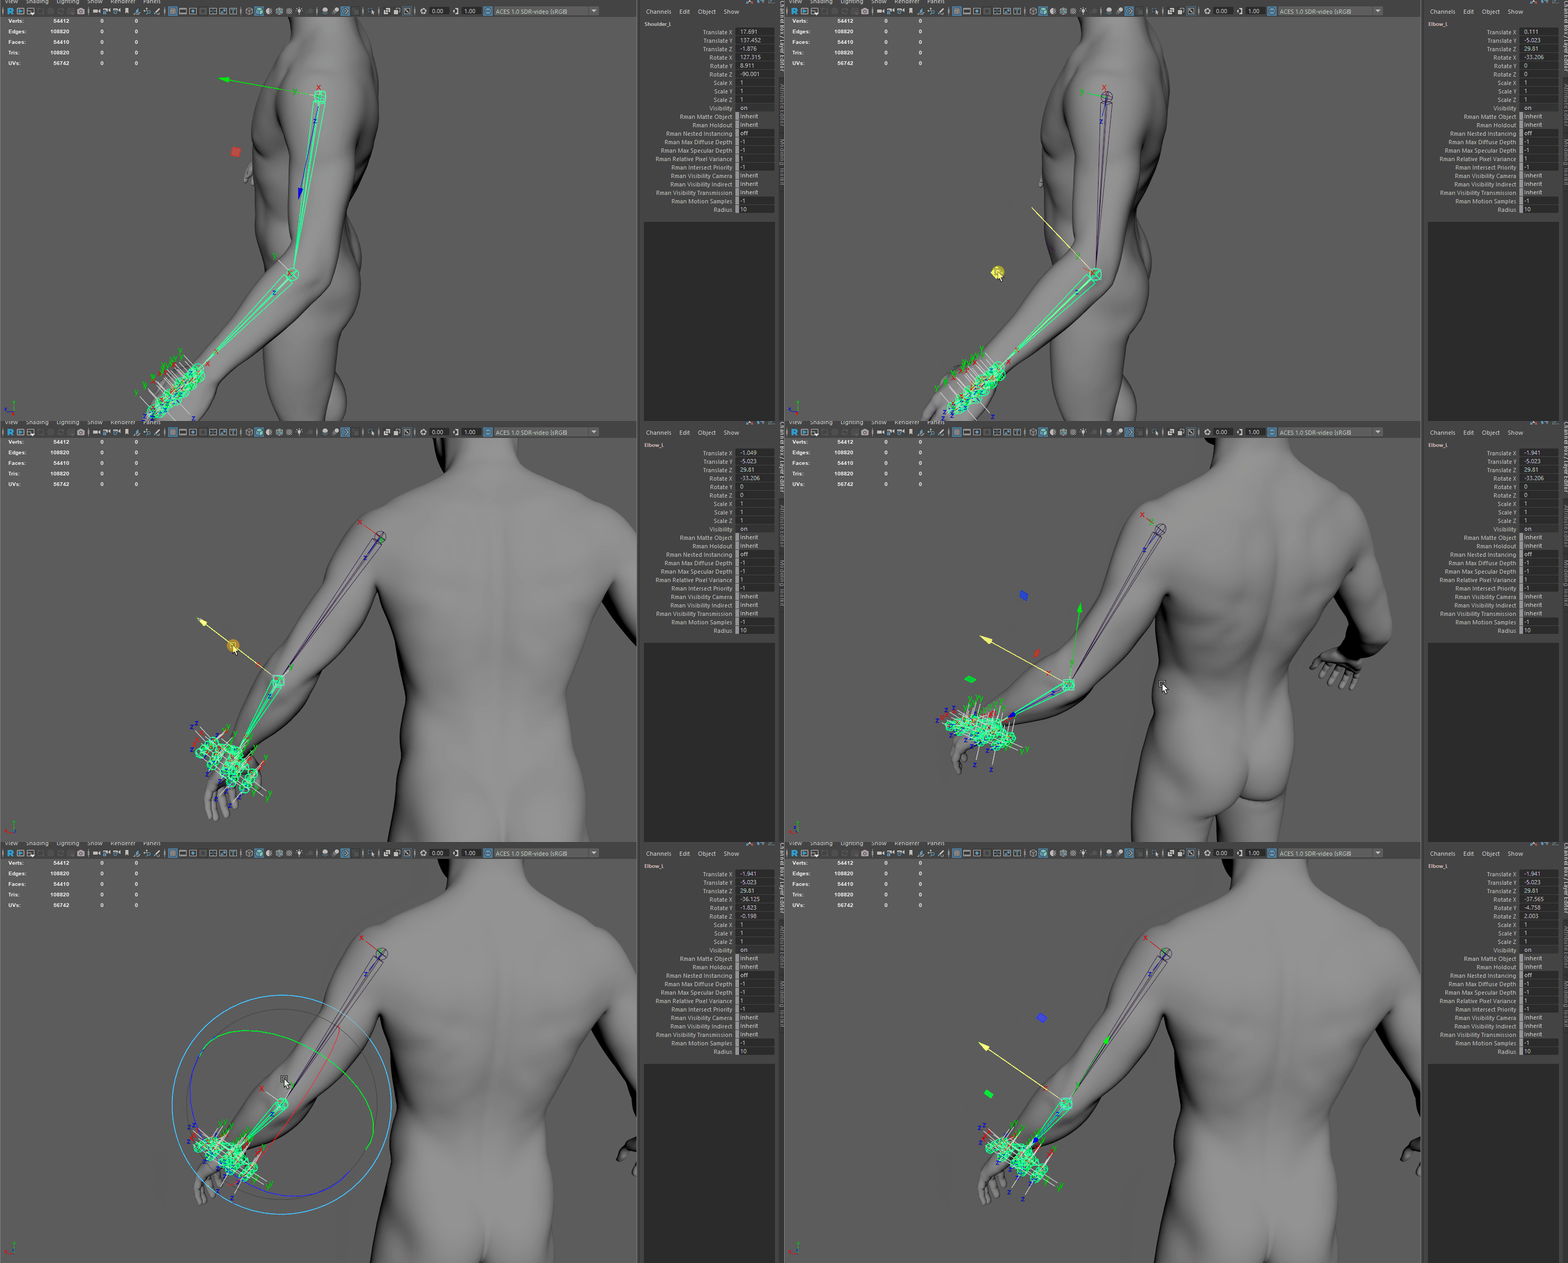
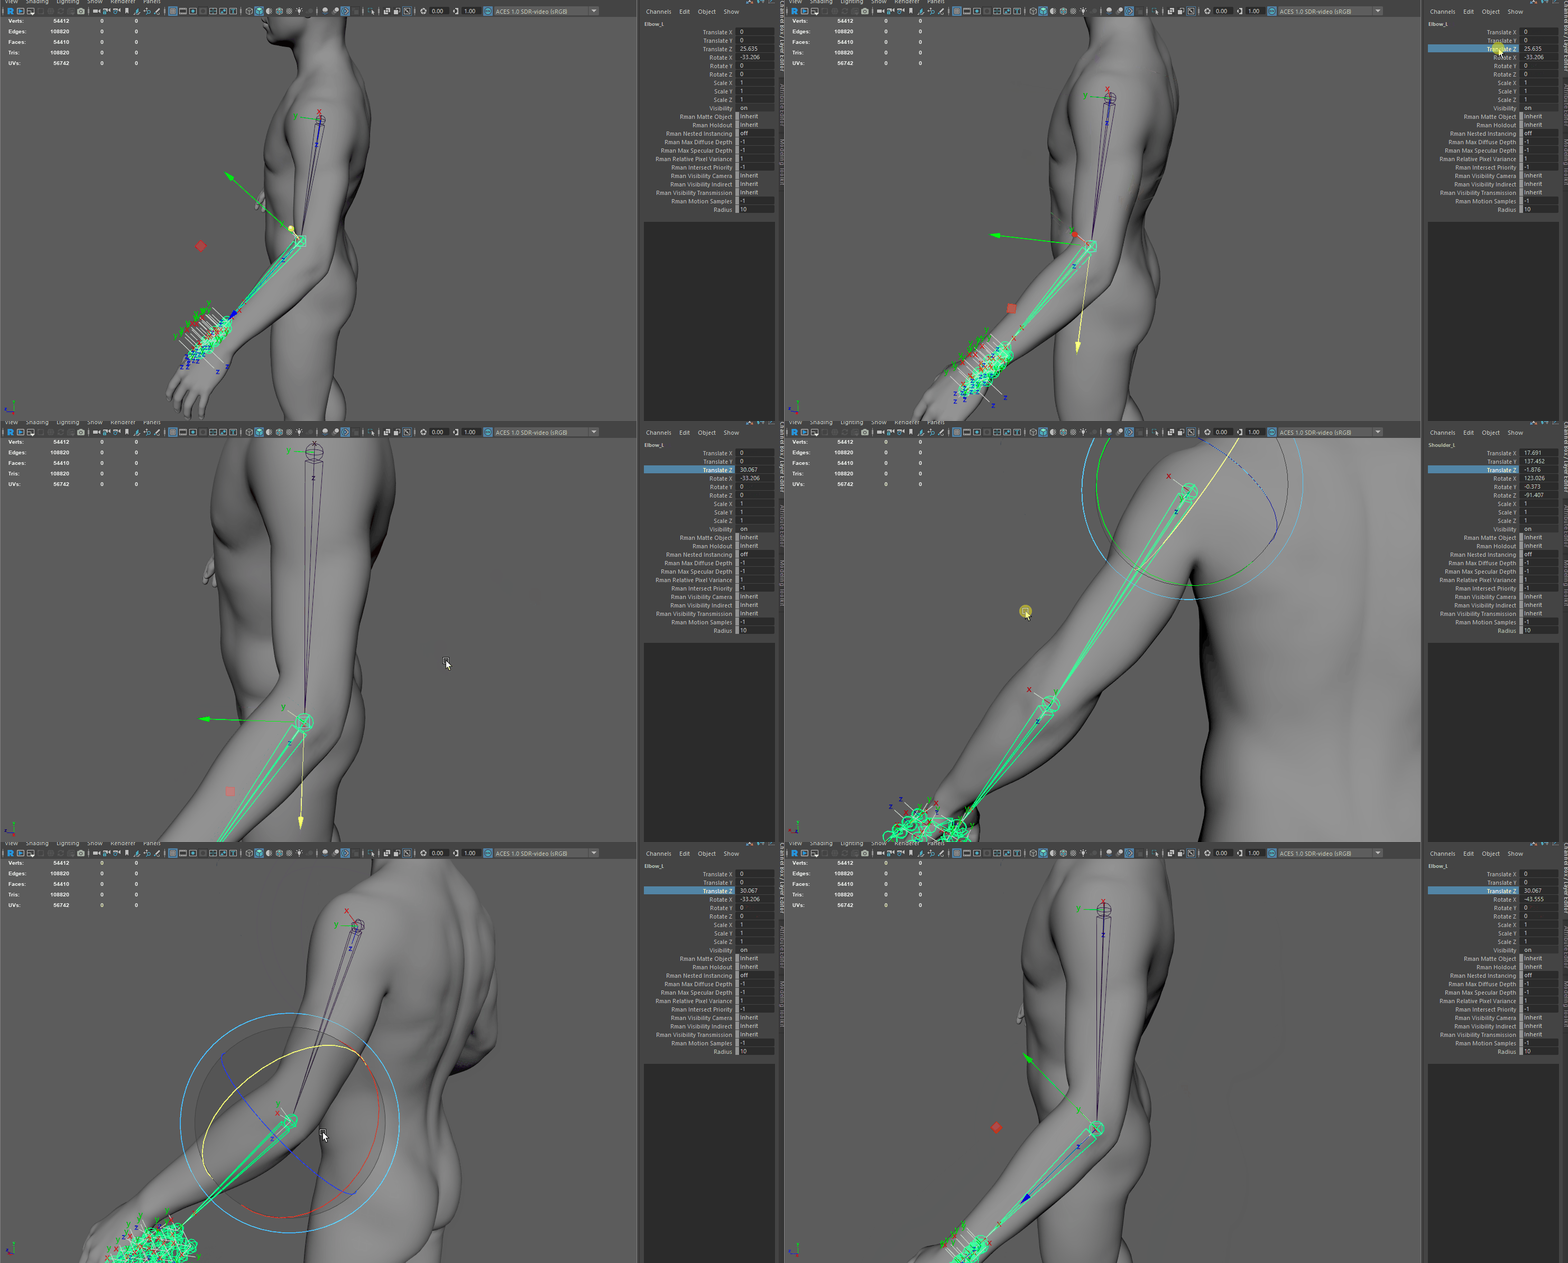
Be careful with this step; it is very important that the joint for your elbow has only one translation and one rotation with values. This will ensure that when you create your IK handle, you achieve correct deformation. To do this, you need to adjust the rotation of your shoulder to perfectly place your elbow.
Don't Do This
Do This
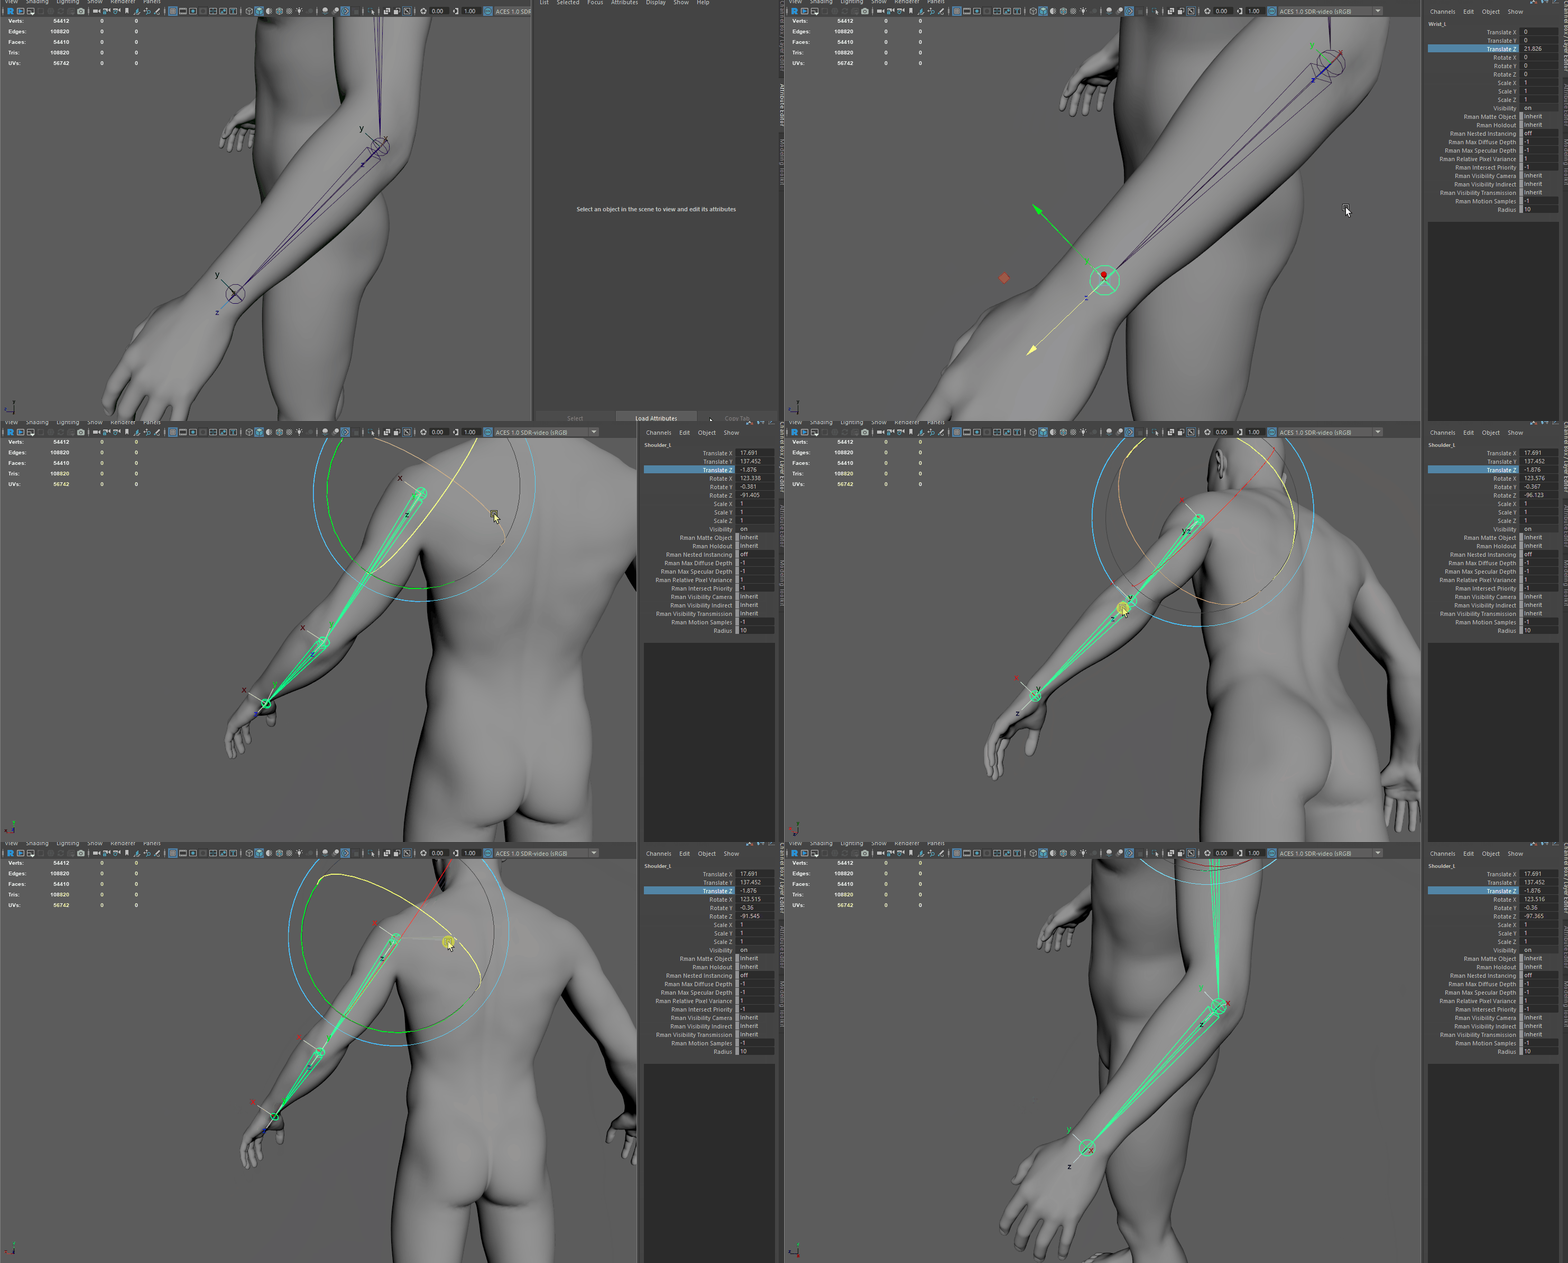
Next, when it comes to the wrist, there aren't many questions to consider; it should be placed perfectly in the middle of the wrist. Because there are so many possible rotations with a wrist, the best solution remains the center of the wrist volume. Also, ensure there is only one translation for the wrist joint.
To place the joints for the hand (keeping the rig quite basic), we will use the following technique for each finger's phalanx: draw a line between the front and the back of the phalanx and place the joint at approximately 2/5 or 2/3 along this line. Ensure there is only one translation and rotation for each joint.
This method will help maintain simplicity and consistency in your rigging process, ensuring proper movement and deformation when animating the fingers.


Repeat the same process for all the fingers.


At this point, you should have a hierarchy for each finger and a hierarchy for your shoulder. All that's left is to take all the fingers and put them into your wrist, and your arm will be finished.


For the legs, we will follow the same approach as with the arms. To place the femur bone, we will draw a line between the perineum and the tip of the pelvis. We will use the same techniques, aiming for approximately 2/3 or preferably 2/5 along this line for the femur.


For the knee, we do the same as for the elbow.


For the ankle, we will do the same as for the wrist; we place it at the center of the volume, and that will work very effectively.
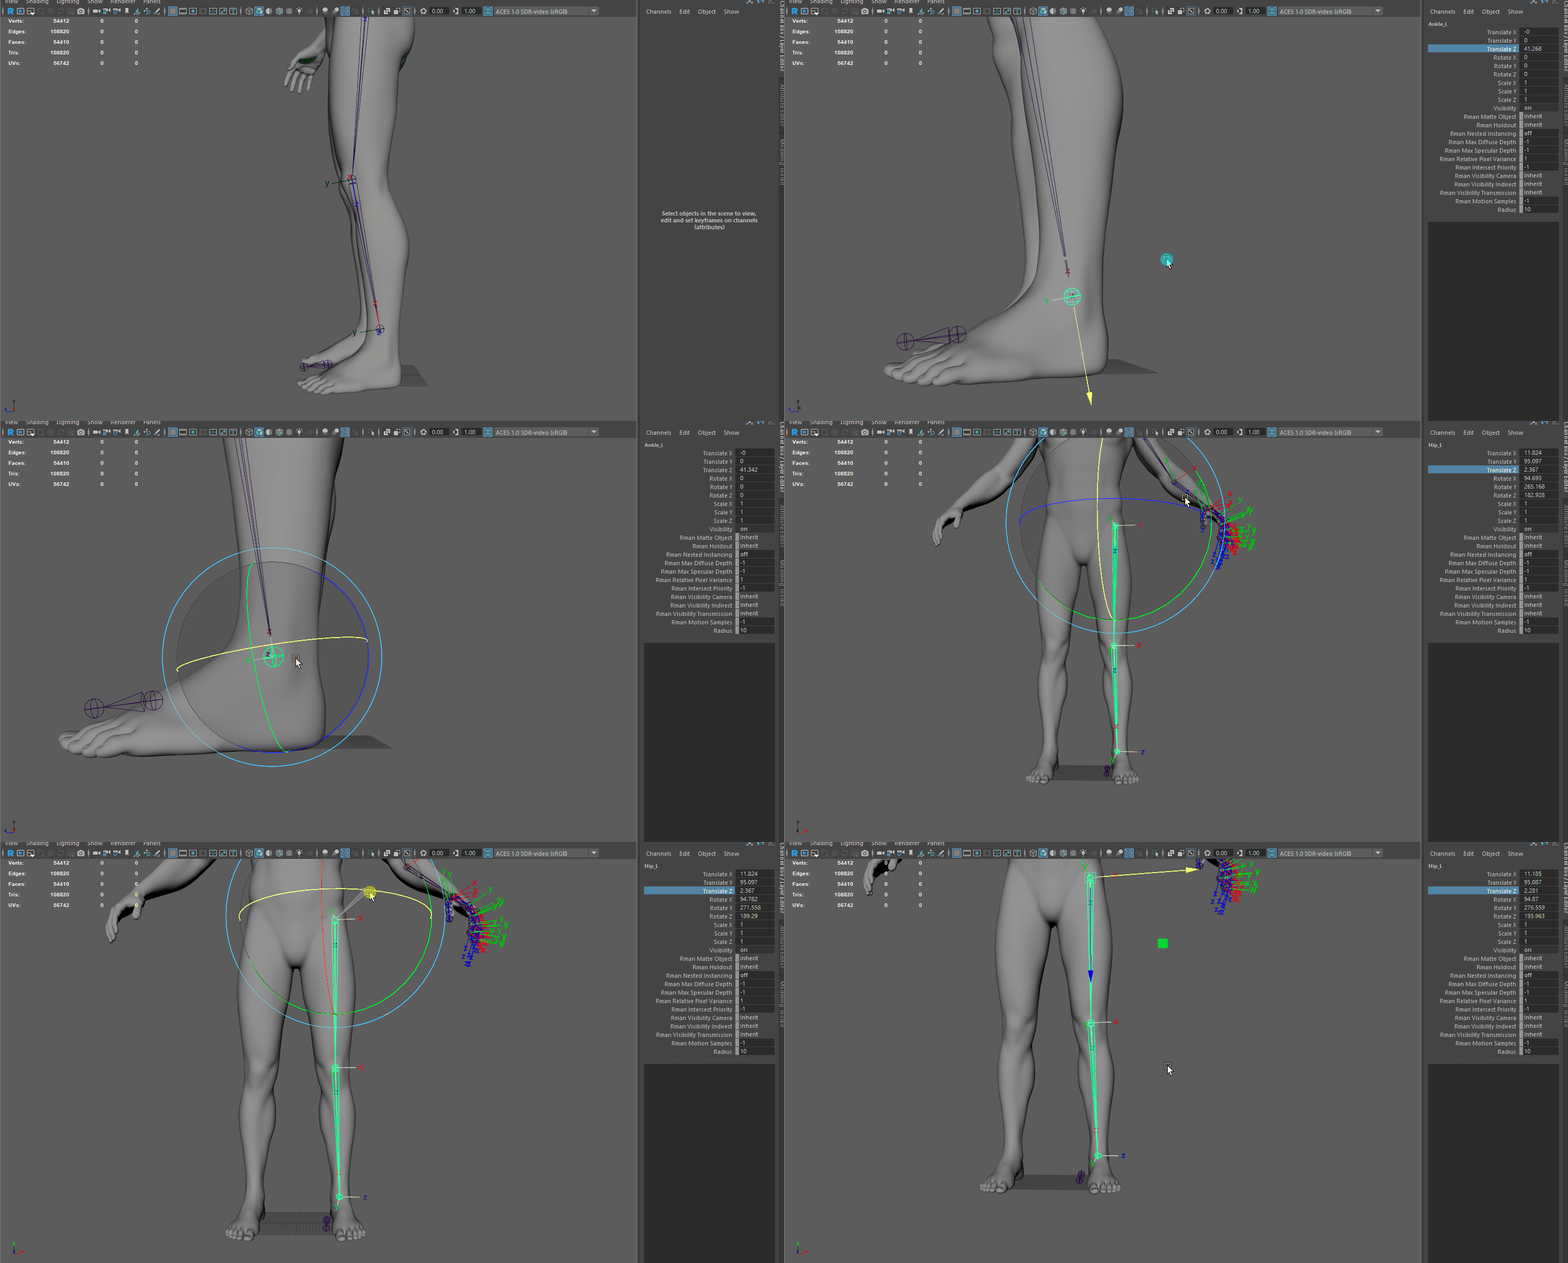
I want to emphasize that sometimes you may need to slightly adjust the position of joints just before finalizing, because the modeling may not be perfectly aligned. This means you might need to rotate the femur or shoulder slightly to match with the wrist or ankle properly.
Moving forward, to complete the leg rig, we will add a joint at the toe articulation, and then it will be ready.


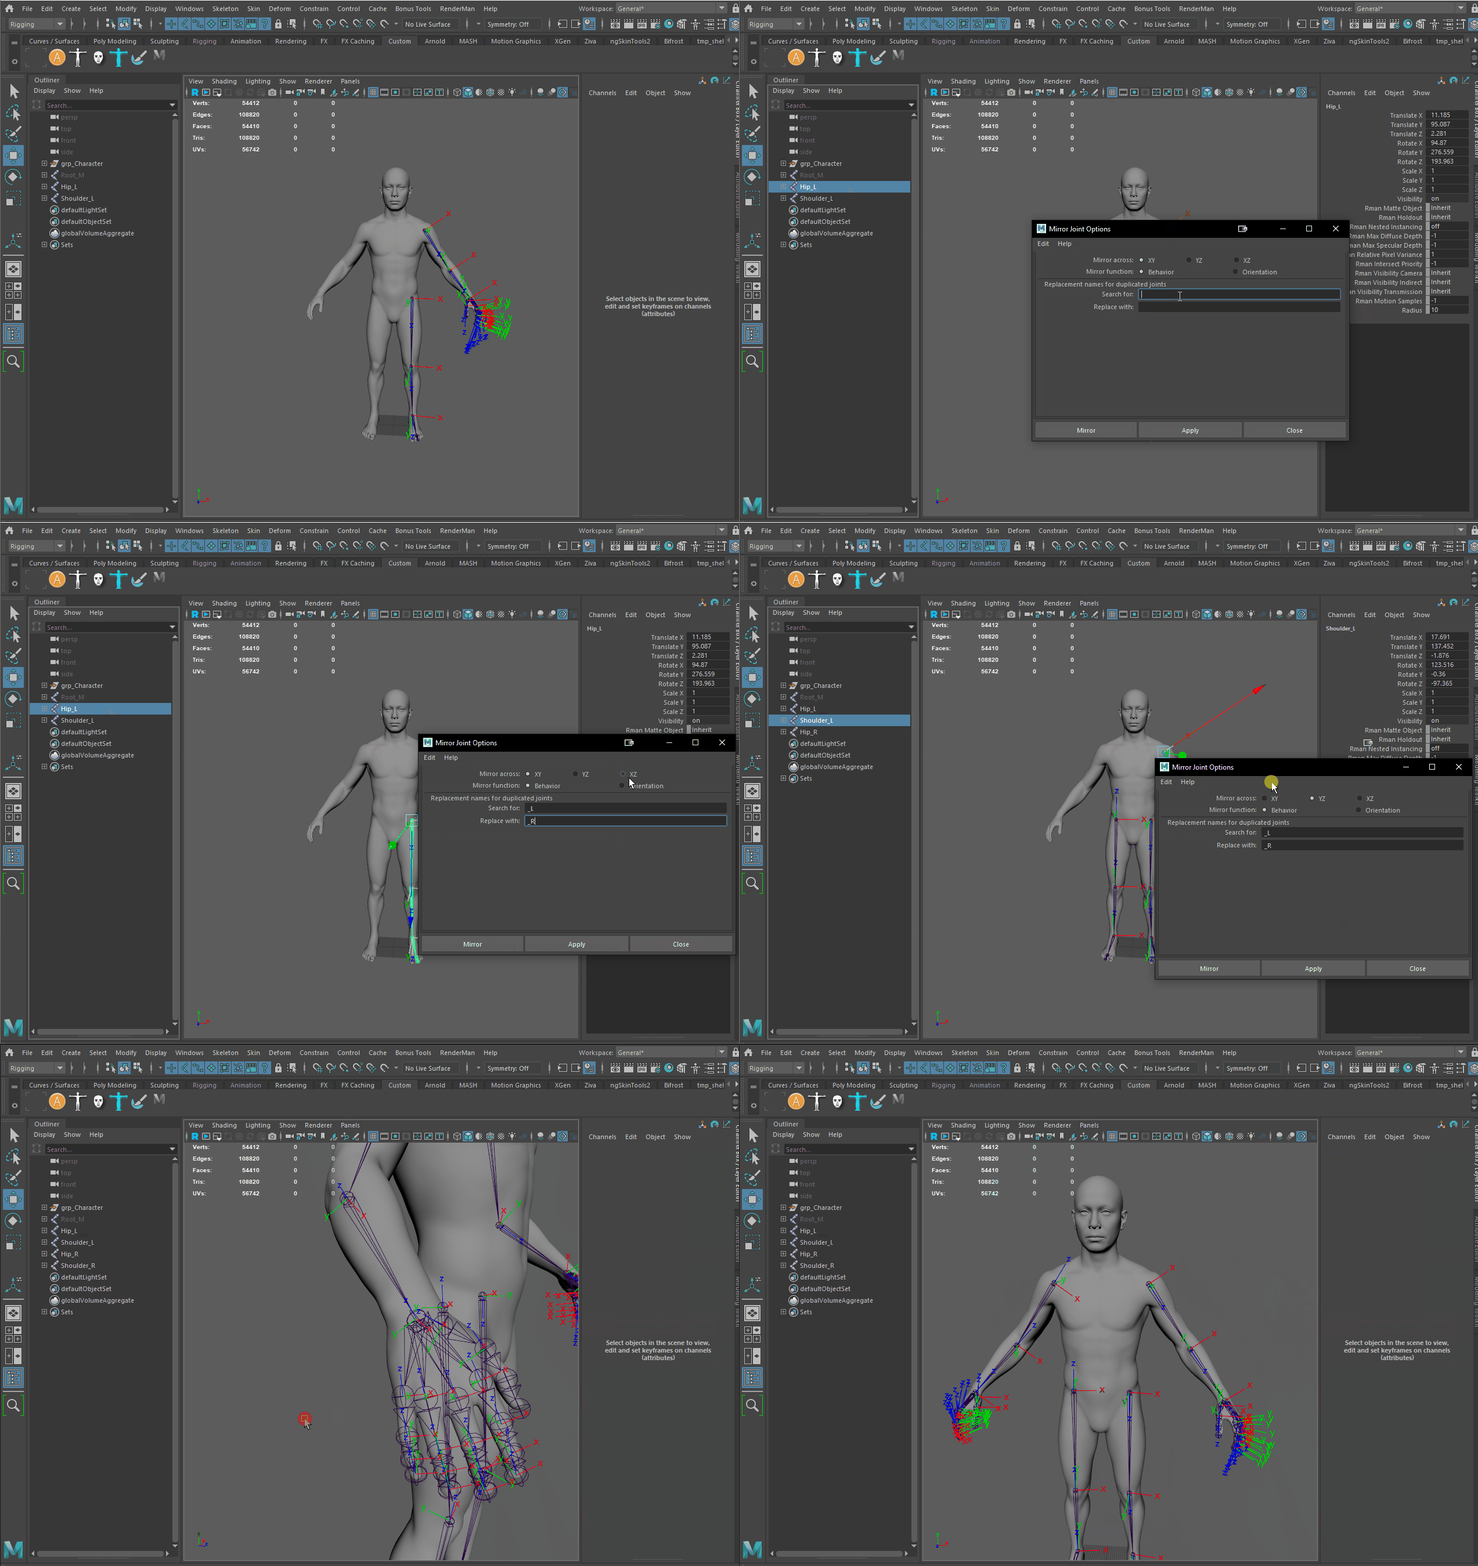
Once you have this set up, if your model is symmetrical, you just need to mirror your joints, and that will complete the limbs of the body.
Now, for the spine, there are two ways to approach it: one more realistic and the other more cartoonish. The realistic approach involves placing the bones exactly where the human spine would be located.

This method will allow you to achieve much more realistic and natural deformations. However, the major drawback comes with exaggerated cartoon-style deformations. In cartoon animation, there might be a non-linear feel because the bones are located further back in the spine. This setup can limit forward deformations and cause misalignment during large rotations and stretches.
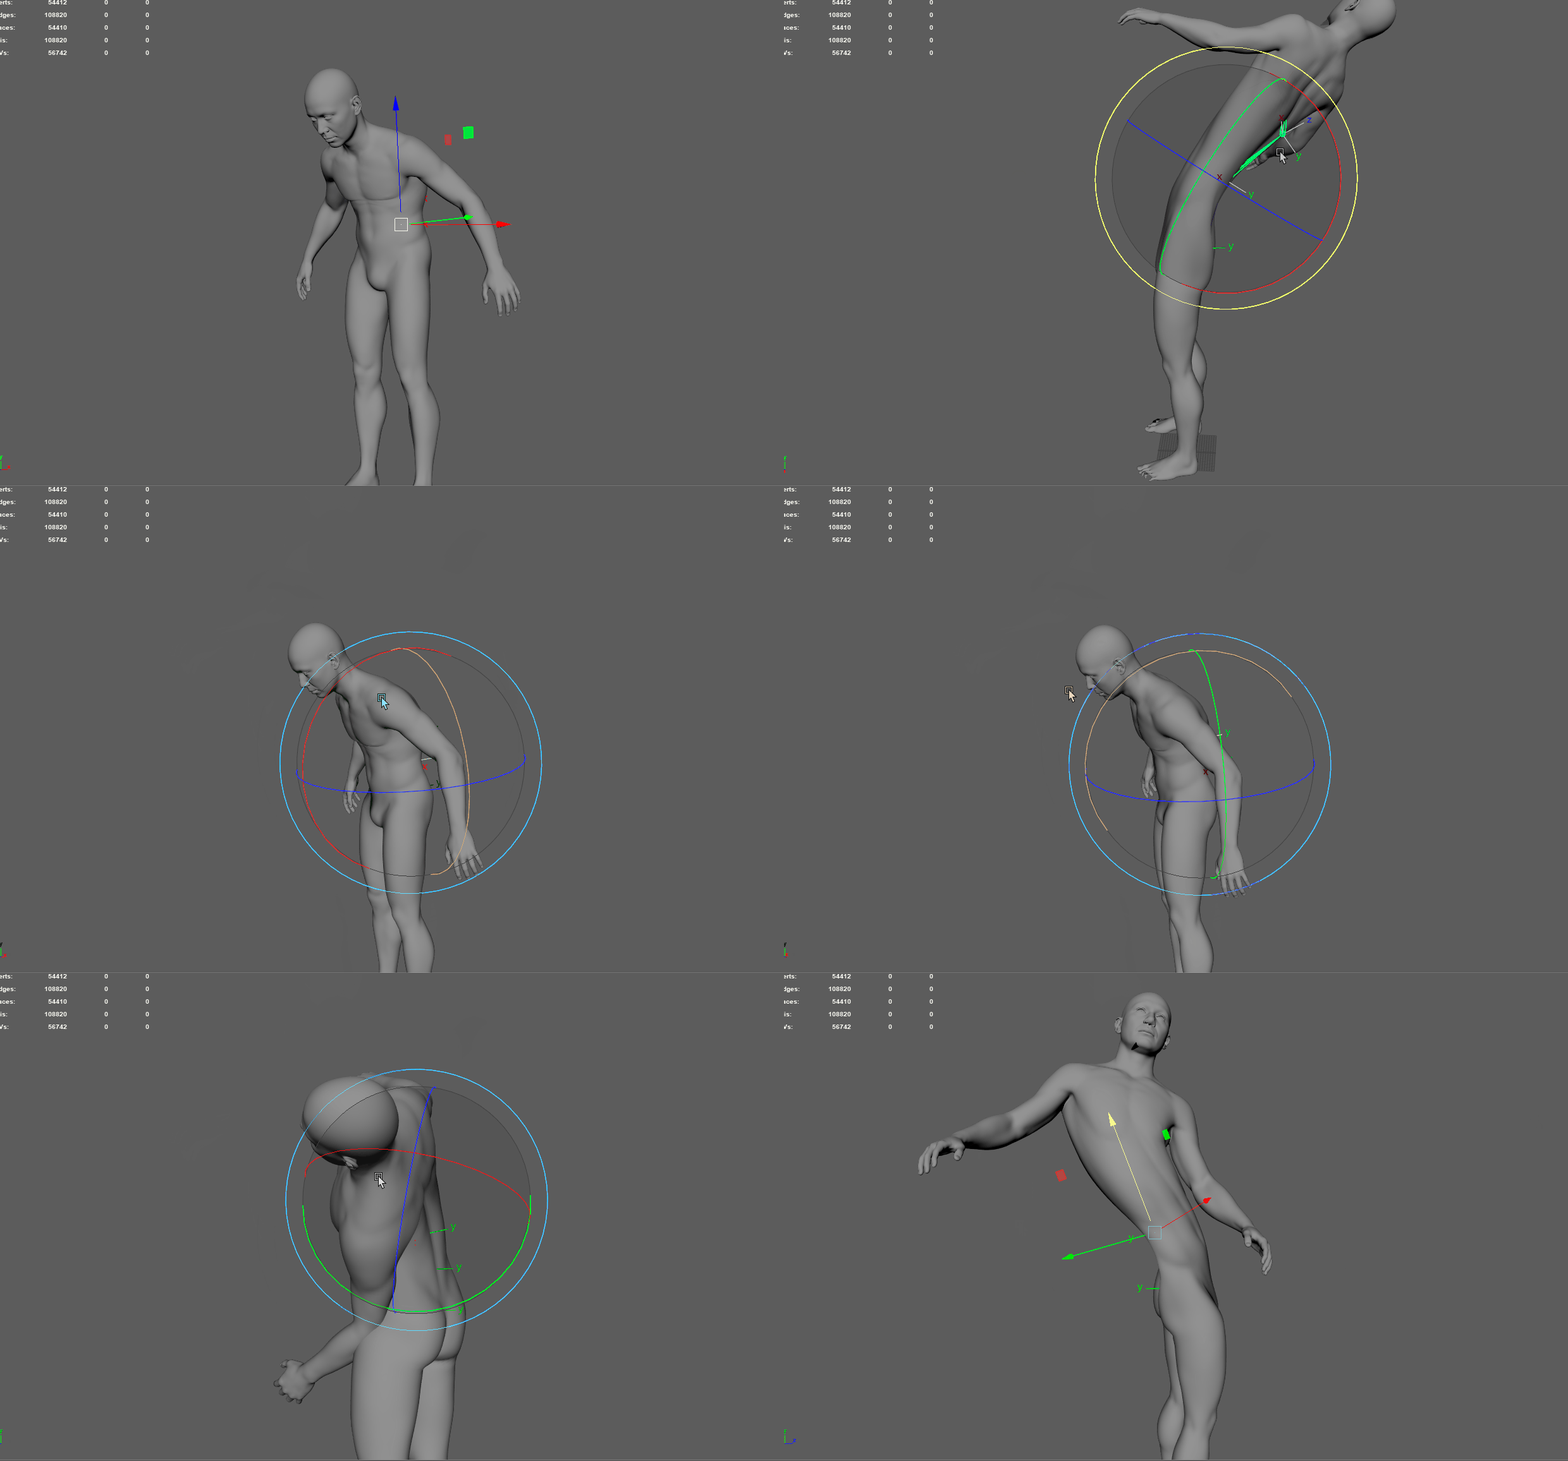
So, if you're rigging a more cartoonish character that emphasizes flexibility in the spine, I would recommend placing the joints more towards the center of the character's volume rather than along the exact spine. This approach might reduce realism slightly but will allow for easier exaggeration and more aesthetically pleasing deformations.

For the spine, there is no right or wrong placement it all depends on what you aim to achieve, whether realism or cartoonish stylization. For our purposes, focusing on a more cartoonish rig, we have placed the joints closer to the center of the model. Once the spine joints are positioned like this...


For the head, we will simply use two joints: one placed under the ears between the jawline and the ears, and another one directly above the head, serving as a guide for the first joint.

For the neck, place 3 joints like this to follow the direction of the head.
At this point in the course, you should ideally have something that looks like this in terms of joints. It's crucial to pay close attention to the placement of your joints because this will allow you to achieve the cleanest and most precise deformations possible.
Neglecting the positioning of joints can lead to poorly executed deformations.


2. How to make the trunk of the body
From this point onward, once all the joints are placed, we can begin placing our first controllers and creating the system that will connect the joints to the controllers. For the spine, neck, and up to the head, we will create a controller for each joint and establish a parent-child chain starting from the base and moving up to the head. These controllers will be named with an "FK" suffix.
Please note that I remind you that the controllers and joints must have exactly the same rotation. Therefore, I recommend using the match transform tool. If you don't remember how to create a controller, I suggest reviewing the first lesson on rigging basics to assist you.


Once we have done this, we will be able to duplicate this spine and create, thanks to the parent-child chain we created before, replacing "FK" with "IK", to create a hybrid IK-FK system. This will consist of having both an IK chain and an FK chain simultaneously. This will allow us to deform any part of the spine at any time without affecting the children of this element.
To do this, we will simply add for each duplicated controller the controller that corresponds to its origin in the first hierarchy.
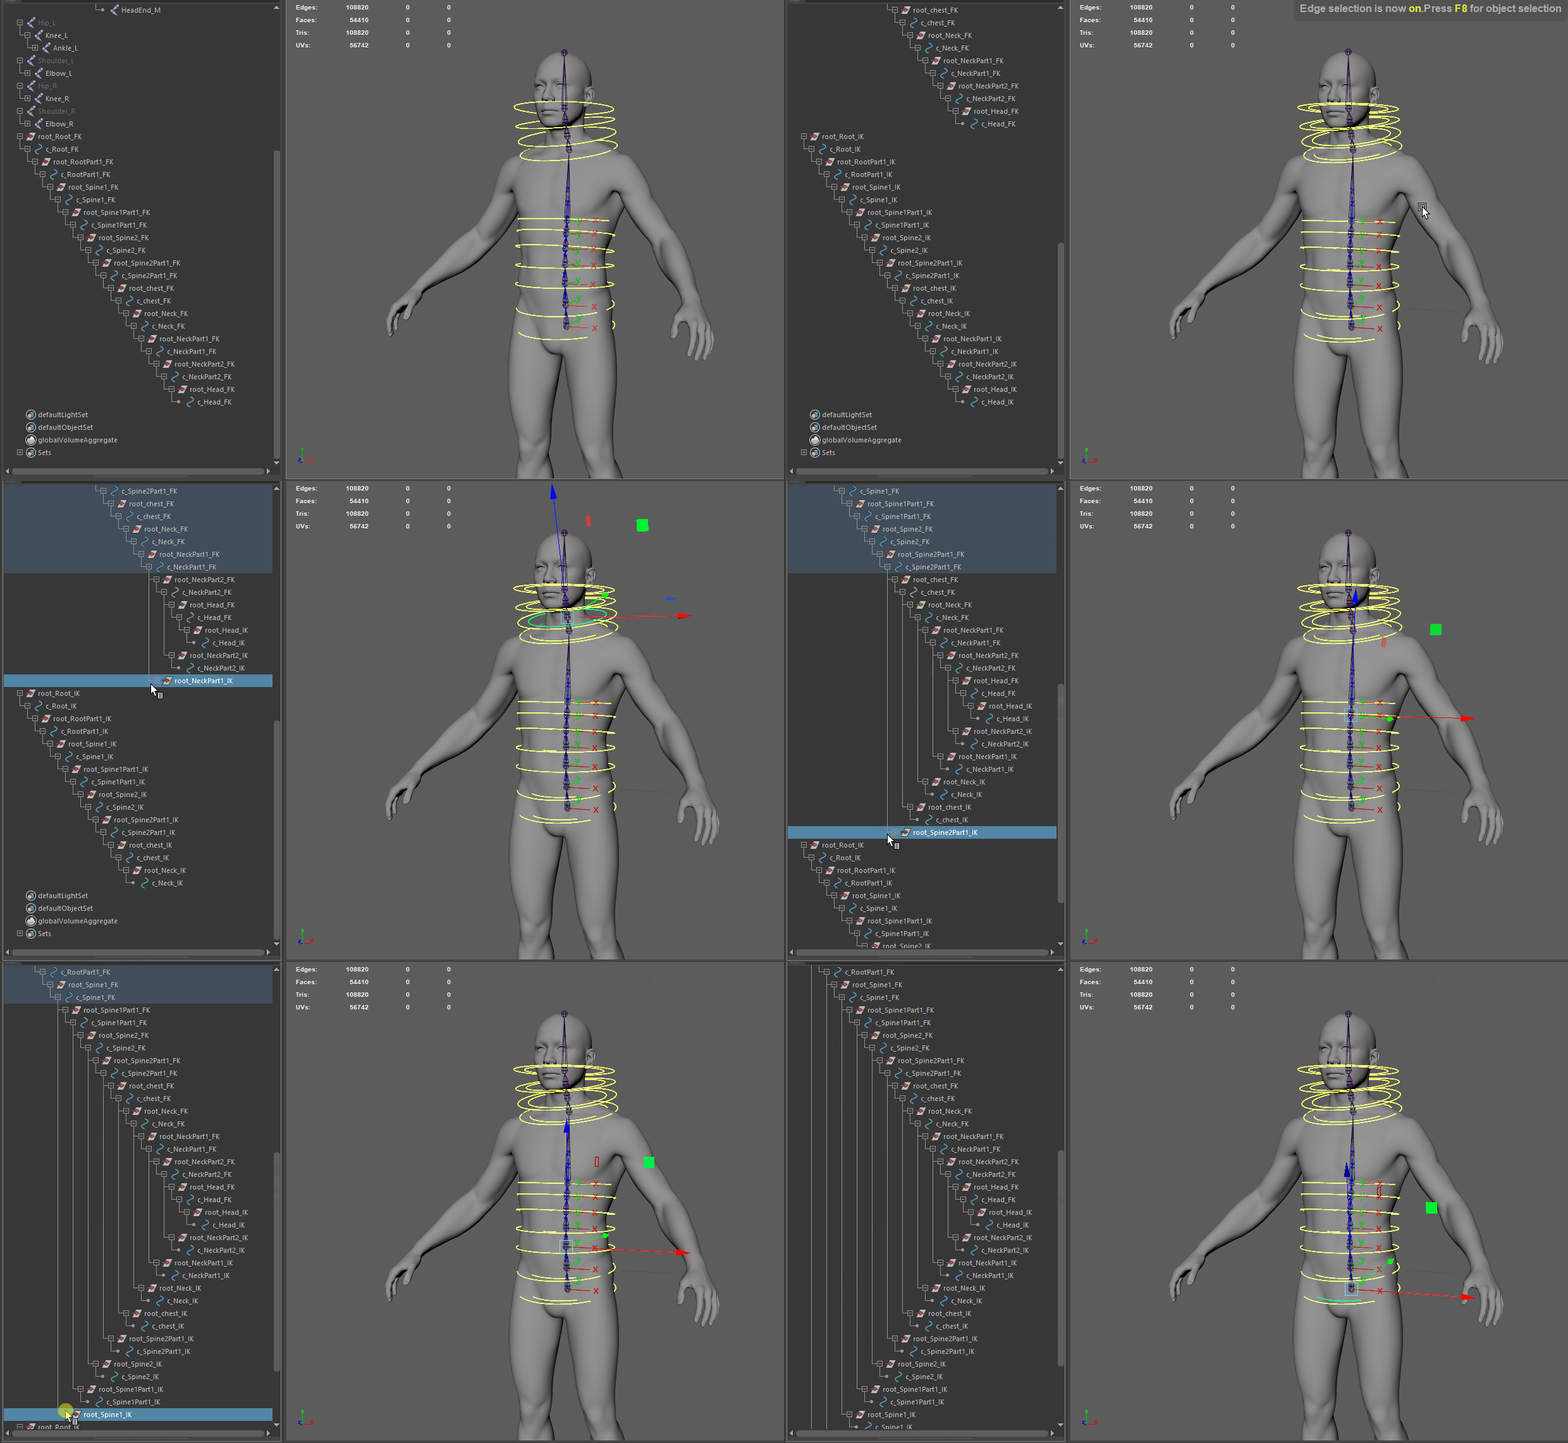
Once this is done, you won't need the IK head controller anymore, so you can remove it as it serves no purpose. Then, you'll need to take each joint associated with your controller and parent that joint to the IK controller in this hierarchy.

Once you have done this, you'll need to remember to reset the rotations to zero for each joint and open the Attribute Editor to do the same for the joint orientation.
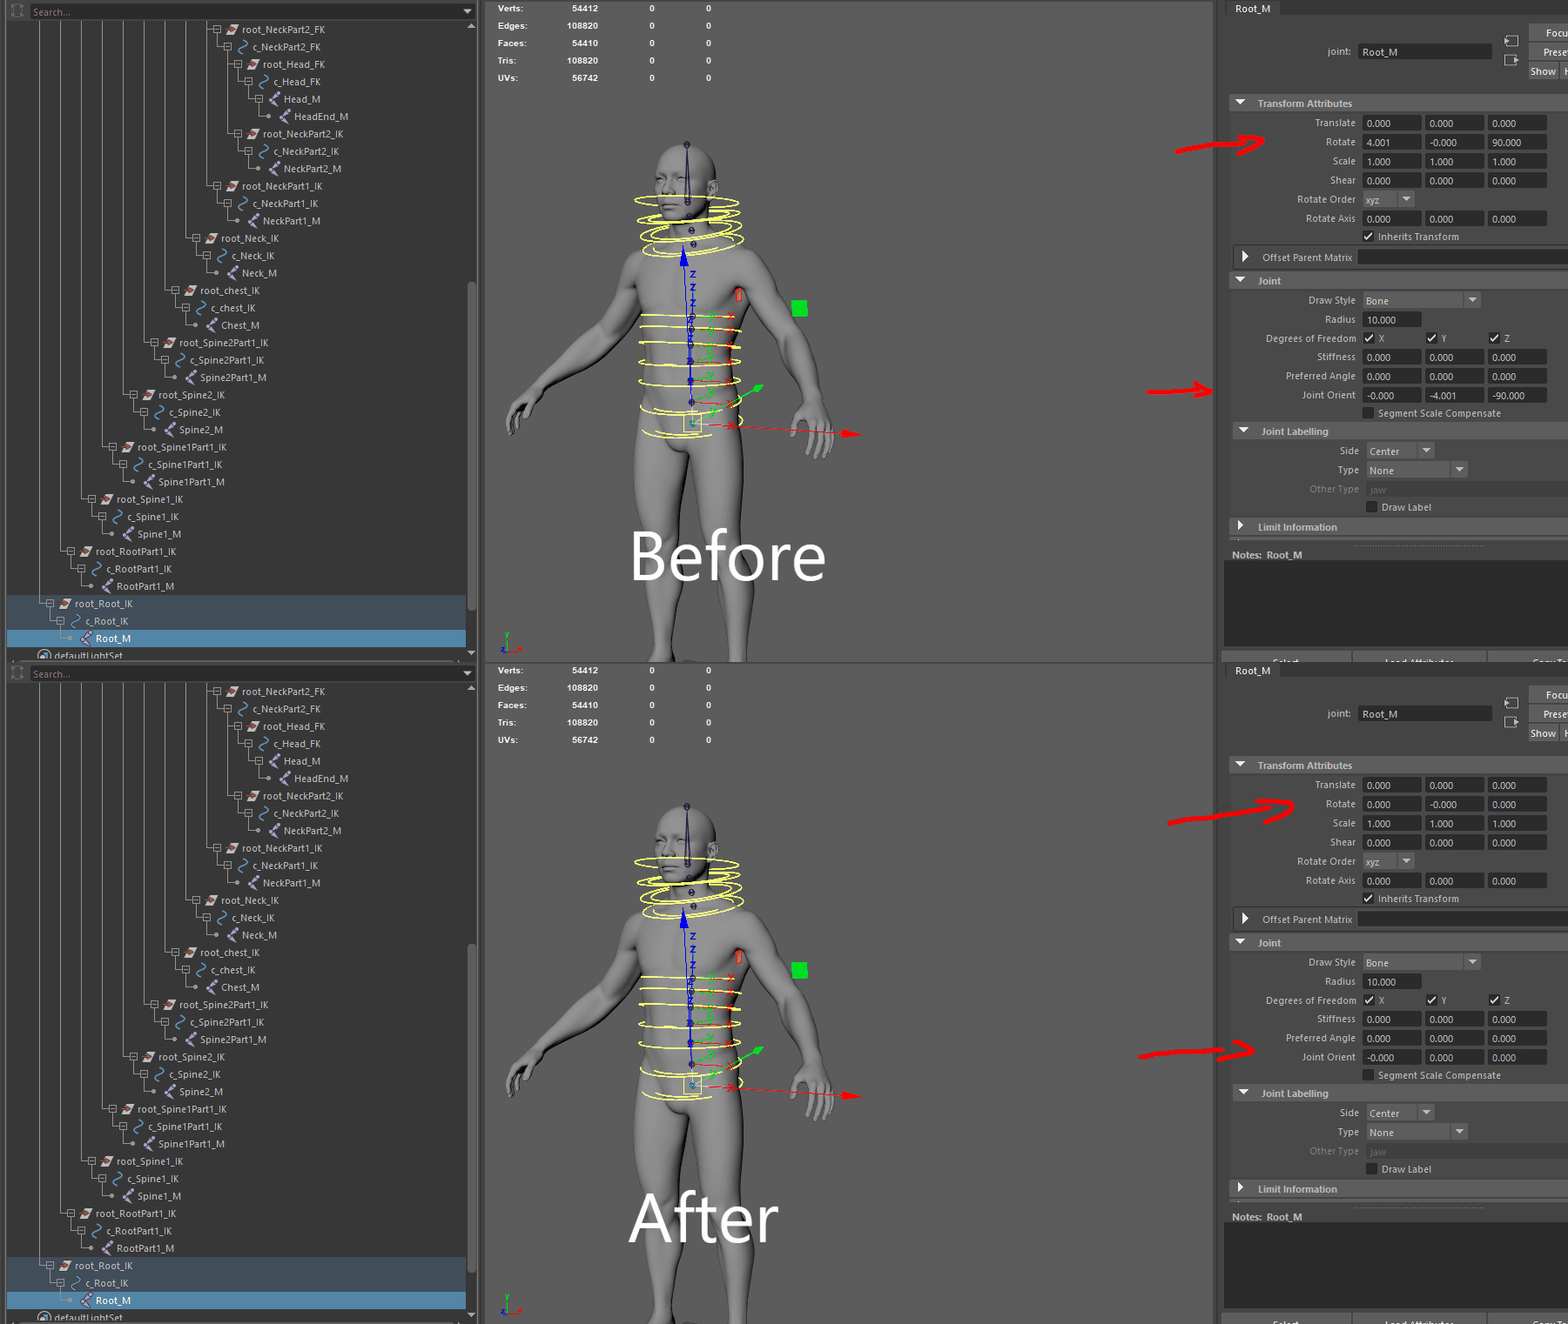
Finally, all that's left is to assign a color and shape to each controller, and you'll be done.

With this method, you will have the ability to deform the spine as you wish, allowing you to create all sorts of shapes and formations, whether it's subtle or exaggerated deformations.
3. Make an IK FK system switch
To create the limbs, we will need to implement an IK-FK switch system. This will allow us to choose how our limbs react and move within the environment either with a parent-child rotation system (FK) or with the child controlling the parent (IK).
To achieve this, we will need to do some technical but straightforward tasks. We will create two types of controllers: IK controllers and FK controllers. One set will form the FK chain, while the other will simply be two unparented controllers.
To do this, we will start with the FK chain. We will create three controllers that we will place on the three joints of the arm: the shoulder, the elbow, and the wrist.


Next, for the IK chain, we will simply create two unparented controllers for the elbow and wrist. Rename them with an "IK" suffix. One controller will be for your IK handle, and the other will be for your pole vector. The "C_PoleVector_L_IK" should have zero rotation, while the "C_Wrist_L_IK" should be matched to the joint so they have the same rotation.


Next, you will need to create three joints for the shoulder, elbow, and wrist. You can use match transform to quickly align them and then parent them together to form a hierarchy. These 3 joints will allow you to create the IK chain under your IK system. After creating your IK handle, simply place your IK handle under the wrist IK controller.

From here, we now have an FK chain with three controllers, an IK chain with two controllers, and three joints with an IK handle all based on the initial setup.
With this, we will create a node-based system in the node editor. We will connect the joints created initially and blend their positions between the FK controllers and the IK joints. This system will allow the arm joints to follow either the position of the IK handle joints or the FK controllers. Using nodes like pairBlend and decomposeMatrix in Maya, we can interpolate between the IK joints and FK controllers to smoothly transition or switch between these two hierarchies.
Example
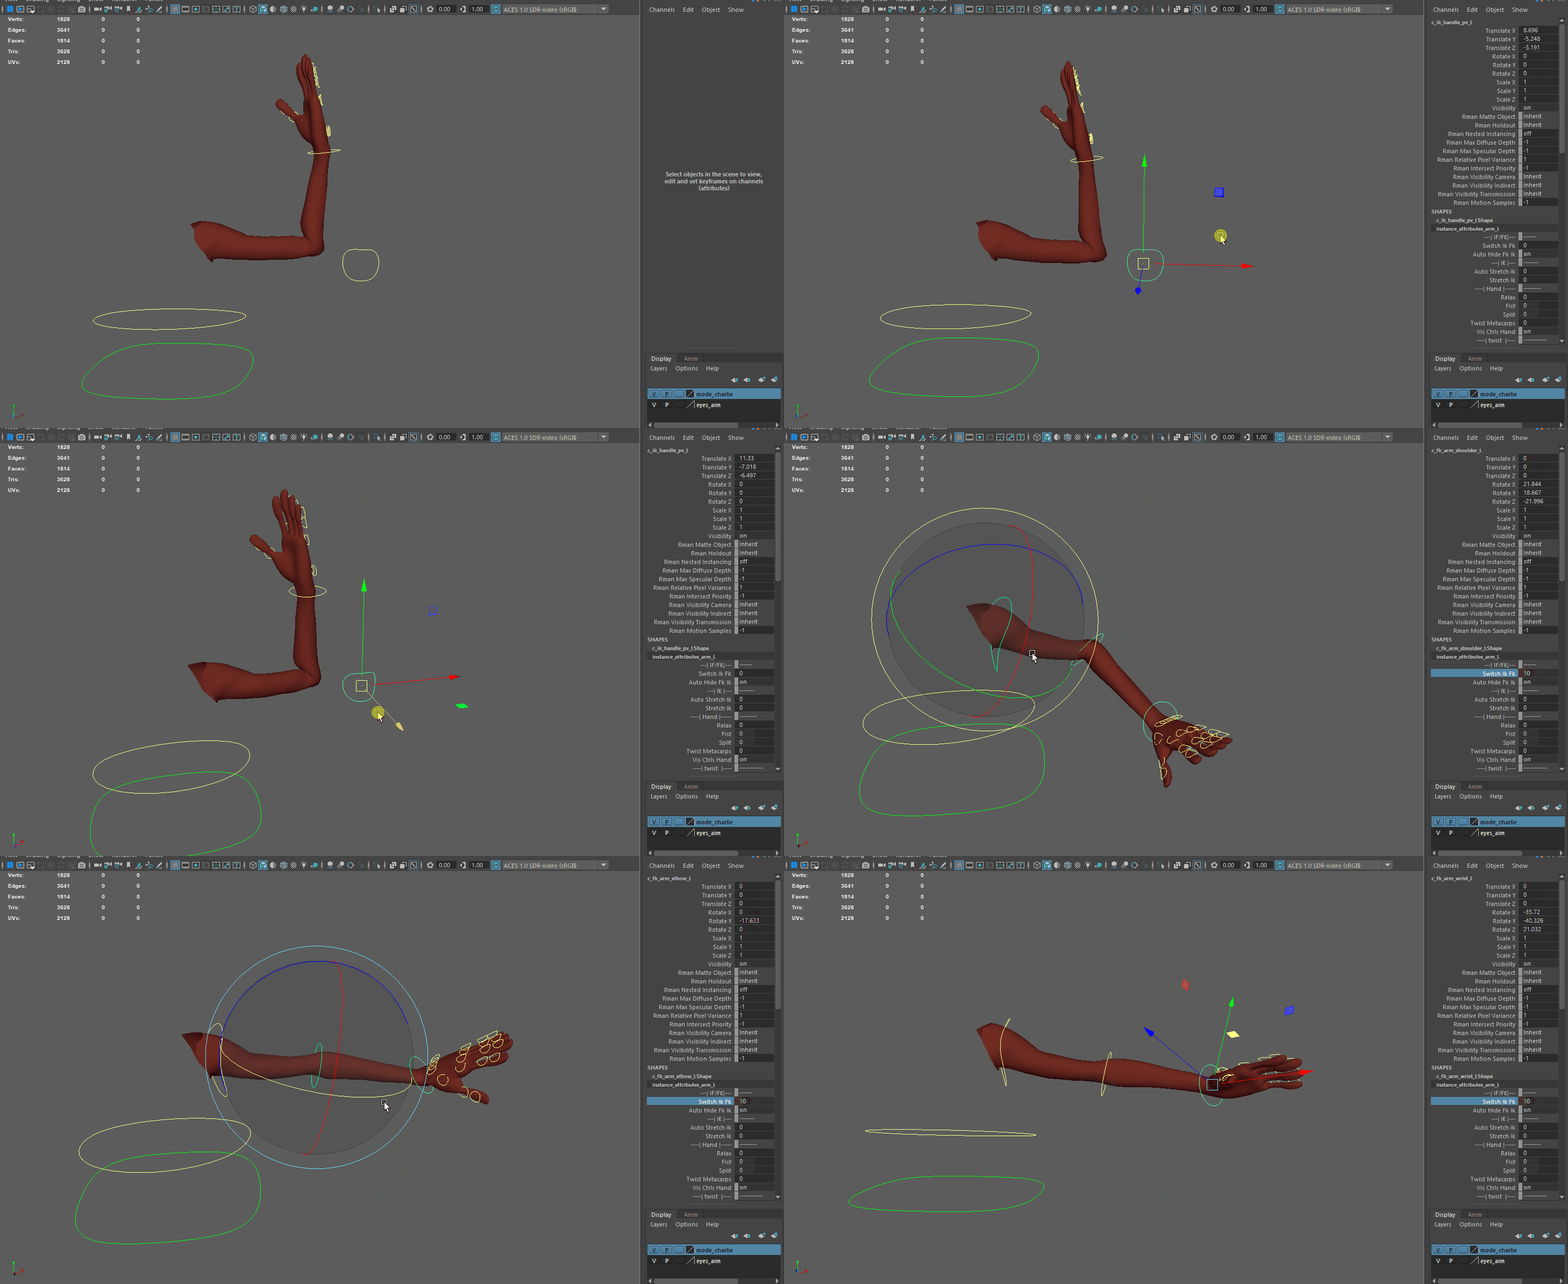
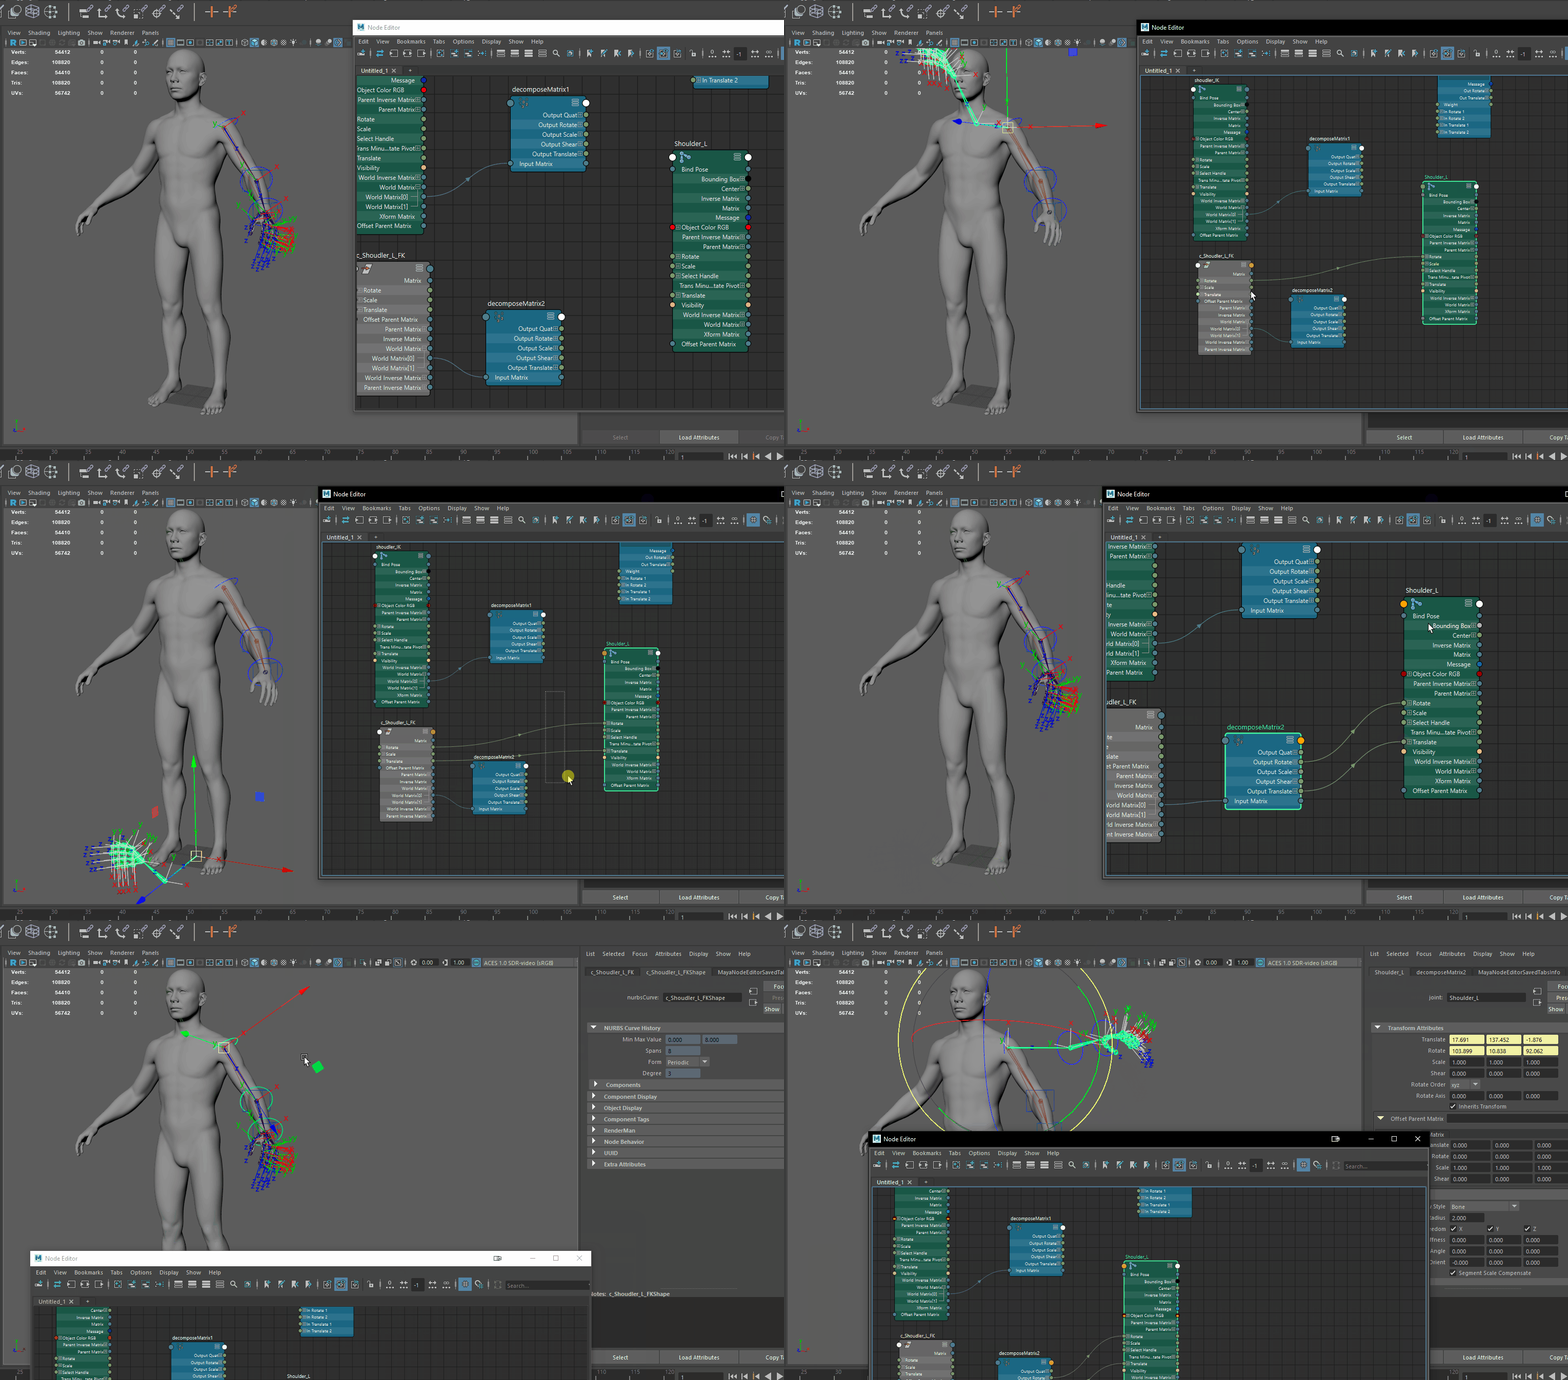
So, to achieve this, we will go into the Node Editor and add the FK controller for the shoulder, the IK joint from the IK handle for the shoulder, and the shoulder joint that we created initially.

Next, we will start by using two decomposeMatrix nodes and one pairBlend node. The decomposeMatrix nodes will help us extract the world matrices of the IK joint and the FK controller, allowing us to retrieve the global rotations of both systems (IK and FK).
Firstly, we will connect the World matrix of the IK joint into a decomposeMatrix node. Similarly, we will connect the World matrix of the FK controller into another decomposeMatrix node.

It is crucial to use decomposeMatrix nodes to extract the global rotations and translations of the different modes. If we were to use, for example, the "c_Shoulder_L_Fk" directly for rotation indexing, the issue arises because in its default state, the rotations of "c_Shoulder_L_Fk" are zero, as are the translations. This means that using it directly would place the arm at the world center, as we would be retrieving local coordinates rather than global ones. Hence, decomposeMatrix nodes are used to retrieve the global position of the FK controller and the IK shoulder.
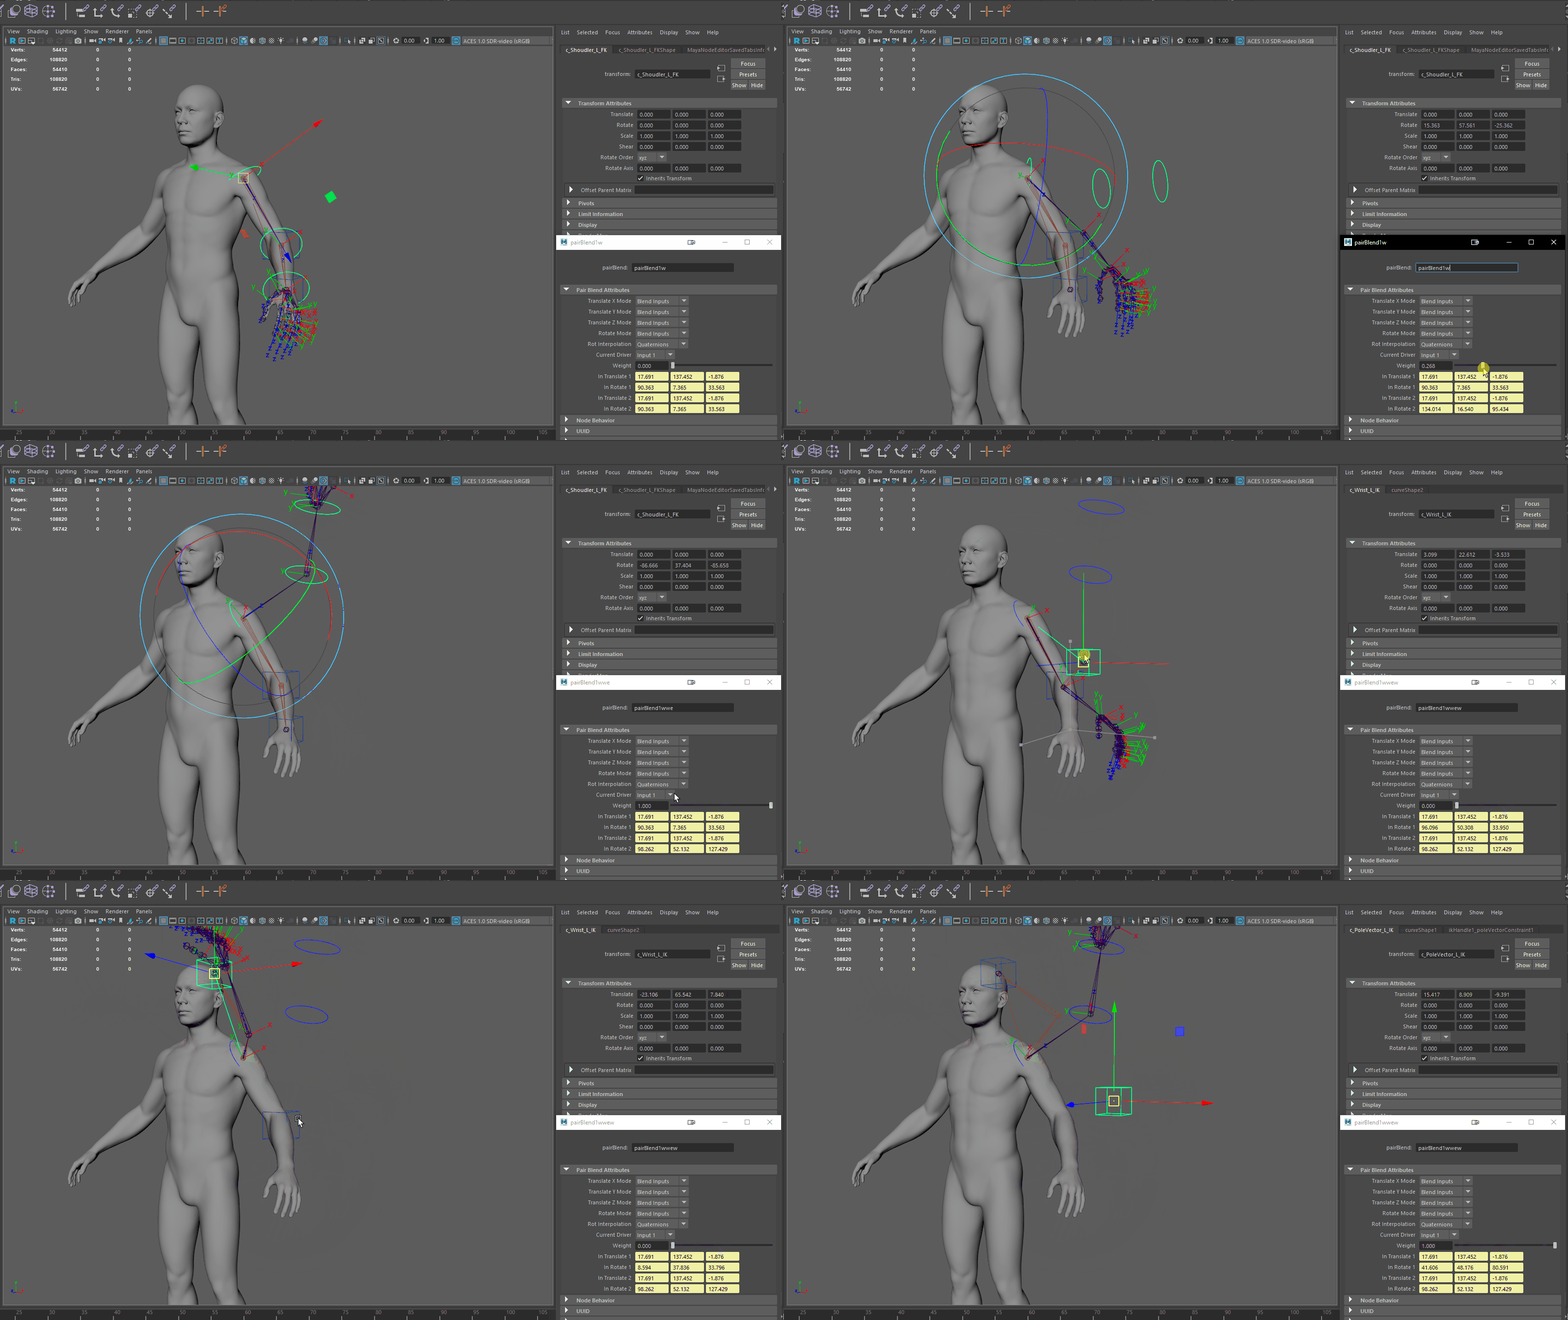
Next, you should connect the elements as follows:
-
Connect the translation and rotation outputs from the decomposeMatrix node of the FK controller (decomposeMatrix1) to the rotation1 and translate1 inputs of the pairBlend node.
-
Connect the translation and rotation outputs from the decomposeMatrix node of the IK joint (decomposeMatrix2) to the rotation2 and translate2 inputs of the pairBlend node.
-
Finally, connect the outRotation and outTranslation outputs from the pairBlend node to the joint that was created initially.
Make sure to set the Rot Interpolation mode of the pairBlend node to quaternion, and you should be good to go.

Warning, for this to work correctly, ensure that the IK joints, base joints, and FK controllers are in exactly the same position and rotation, with the same rotation axes. If they are not aligned correctly, you may encounter interpolation issues.
Not the same direction of rotation and not the same axis.

he same direction of rotation and the same axis.
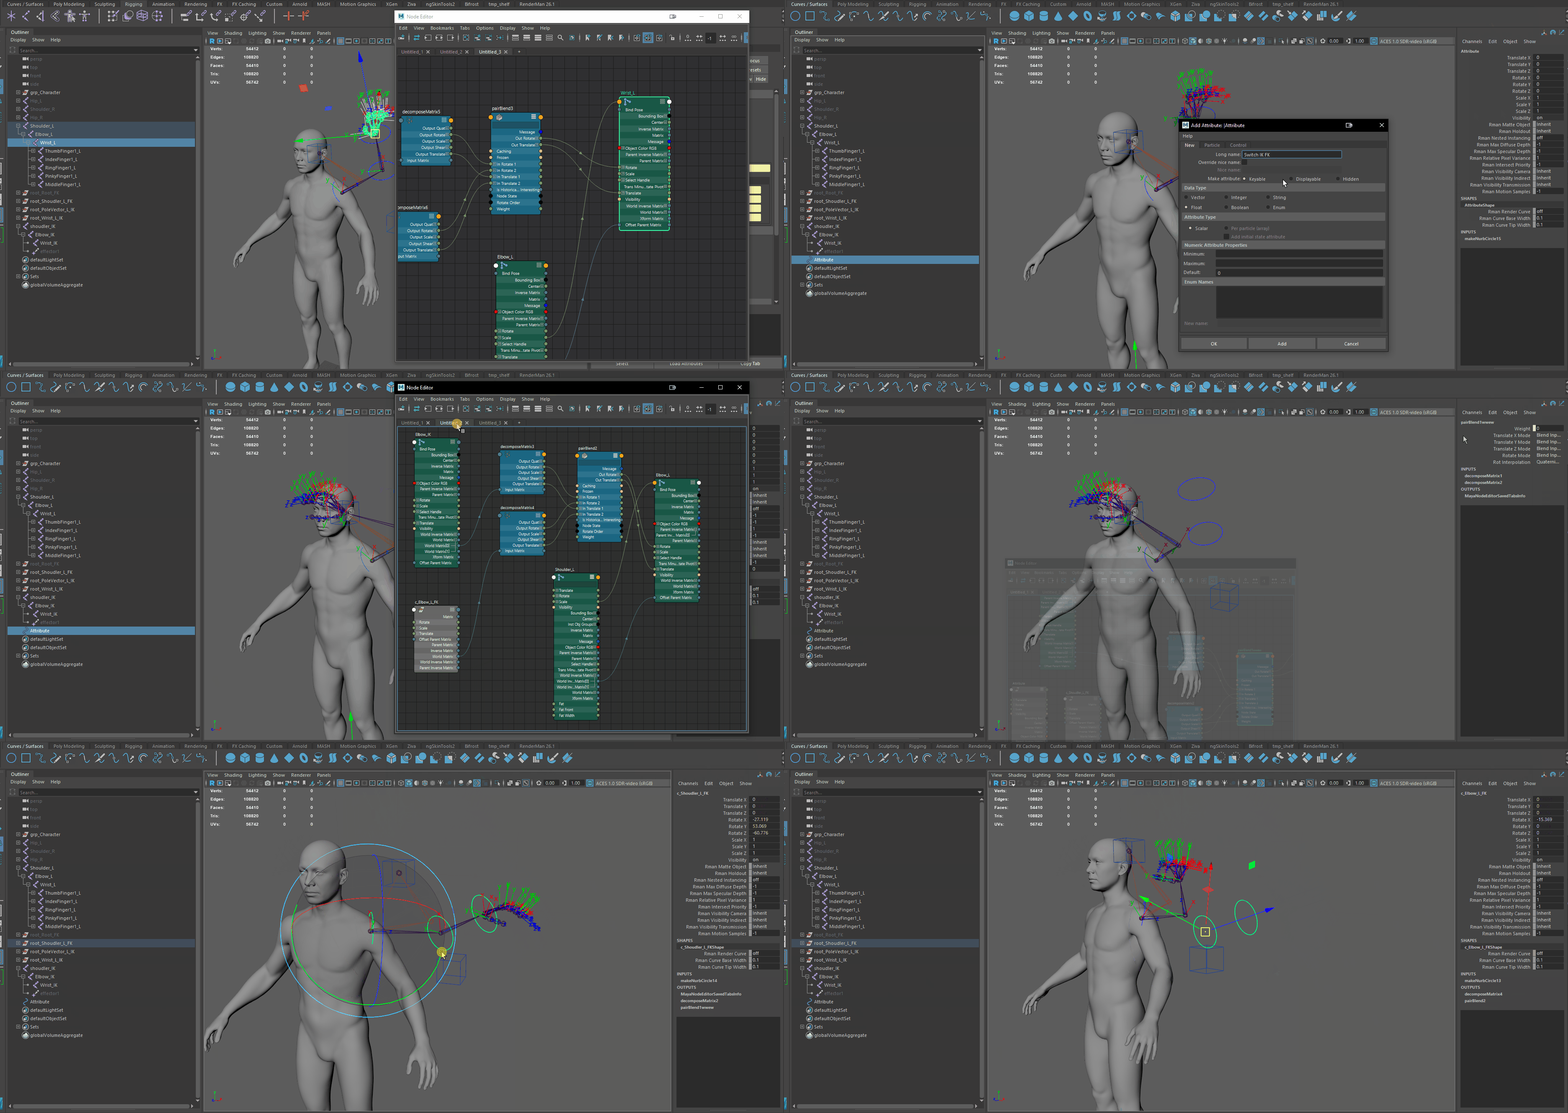
Once you've done this for the shoulder, you'll apply the exact same system for the elbow and wrist.
With a slight nuance: in the offset parent matrix, you'll need to connect the world inverse matrix of the previous joint. So, in our case, the world inverse matrix of the Shoulder_L joint should be connected to the offset parent matrix of the Elbow_L joint.
Then, for the Wrist_L joint, you'll need to connect the world inverse matrix of the Elbow_L joint to the offset parent matrix of the Wrist_L joint.

Next, for the wrist, you'll need to use the controller c_Wrist_L_IK if you want to be able to rotate the wrist. Otherwise, it won't be possible.

Next, if everything is connected correctly, you just need to create any controller or even just a curve. Inside it, you'll create an attribute that allows you to manage the blend weights of the parentBlend nodes. Create an integer attribute ranging from 0 to 1.
After this, you'll be able to switch from IK mode to FK mode simply by adjusting the attribute you created on your curve.
Next, we will add an element to our IK-FK system which is arm stretching. In IK mode, it's often desirable to stretch or squash the arm when manipulating the IK controller.
Creating a stretching system for the arm in this setup is not very complicated. We will calculate the distance between the first IK joint and the last IK joint of your IK handle. Based on this calculation, we can determine whether the arm should stretch or not. If the distance between the first and last joint exceeds a certain threshold, we will scale the arm to simulate stretching.
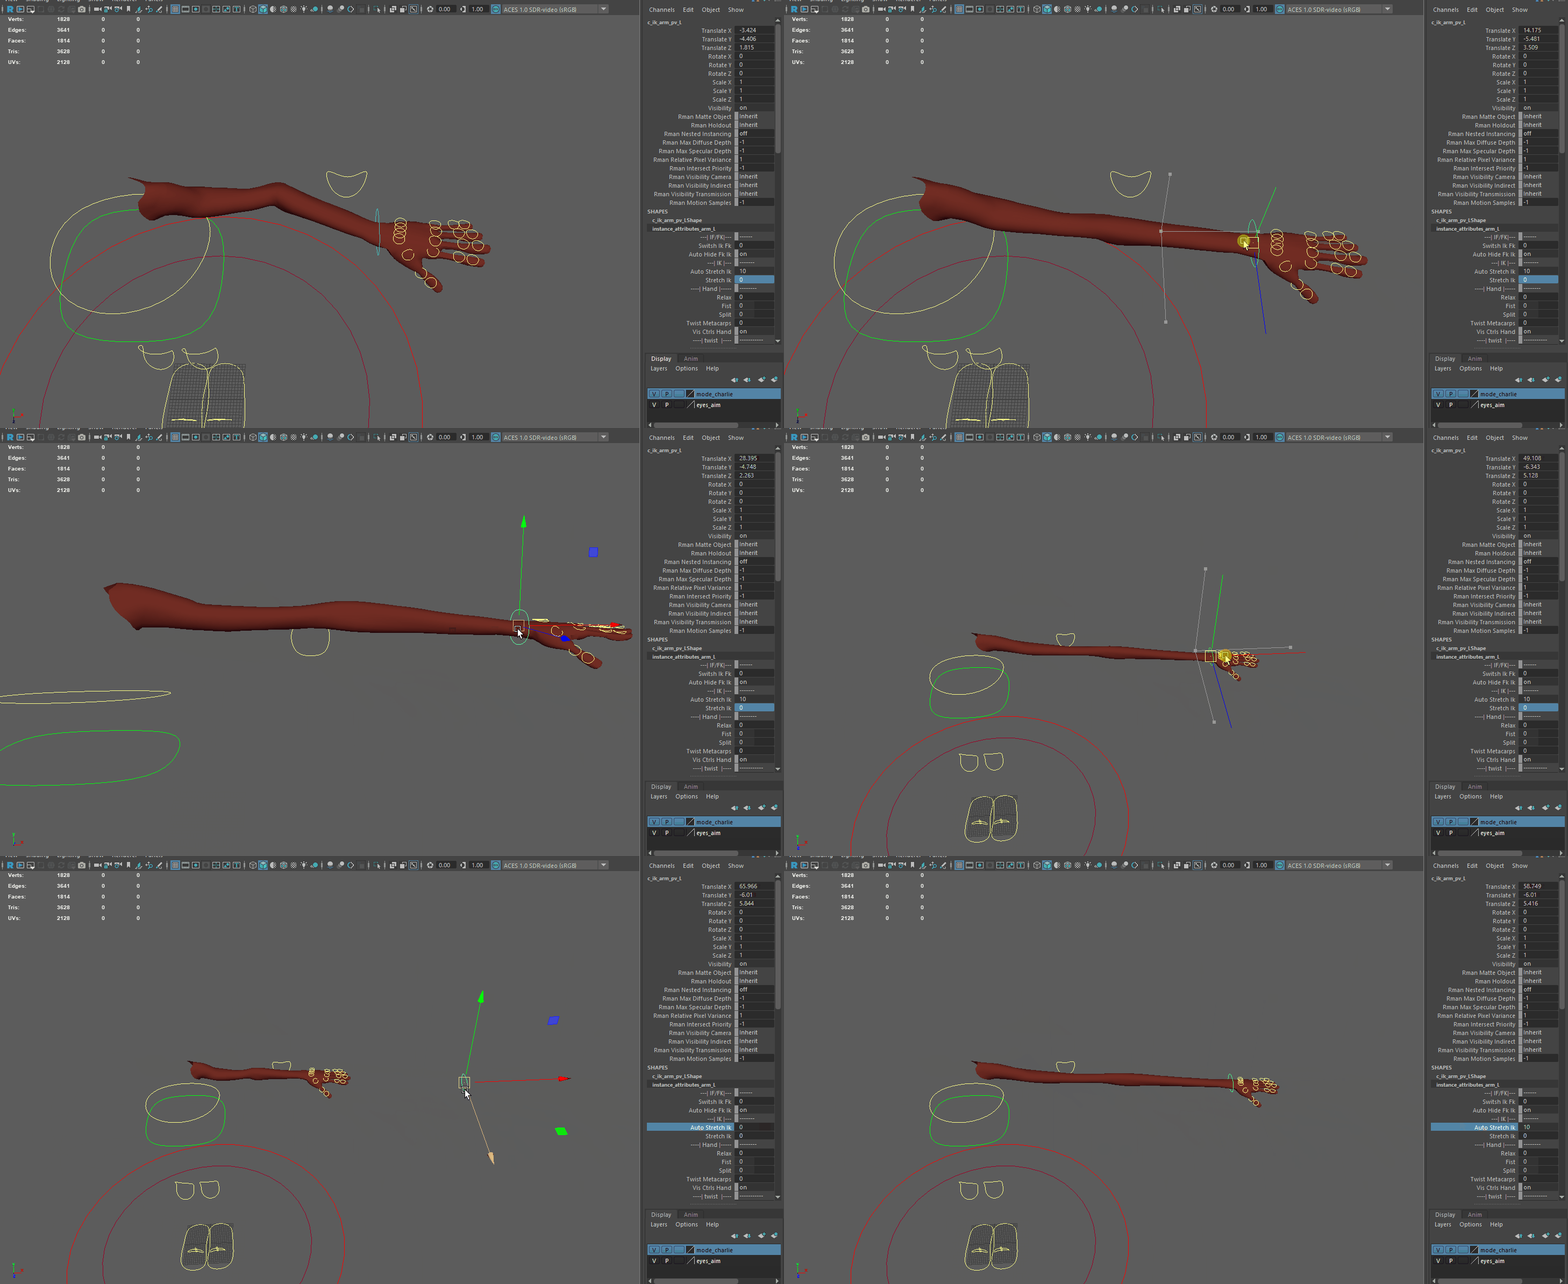
First, we will calculate the distance using a node in Maya called "distanceBetween", which automates this process. Initially, we need to create a group named "grp_shoulder_L" to serve as the starting reference point. This will allow us to measure the distance from this group to the controller "c_Wrist_L_IK".

Next, we will connect the positions of our group "grp_shoulder_L" and our controller "c_Wrist_L_IK". To do this, we will follow a similar process as setting up the pairBlend system by using decomposeMatrix nodes to retrieve the global translation of the group. Then, we will connect the nodes as follows:

With this, we will be able to know at any moment the distance between the shoulder and the wrist, which will allow us to determine if the arm is extended or not.
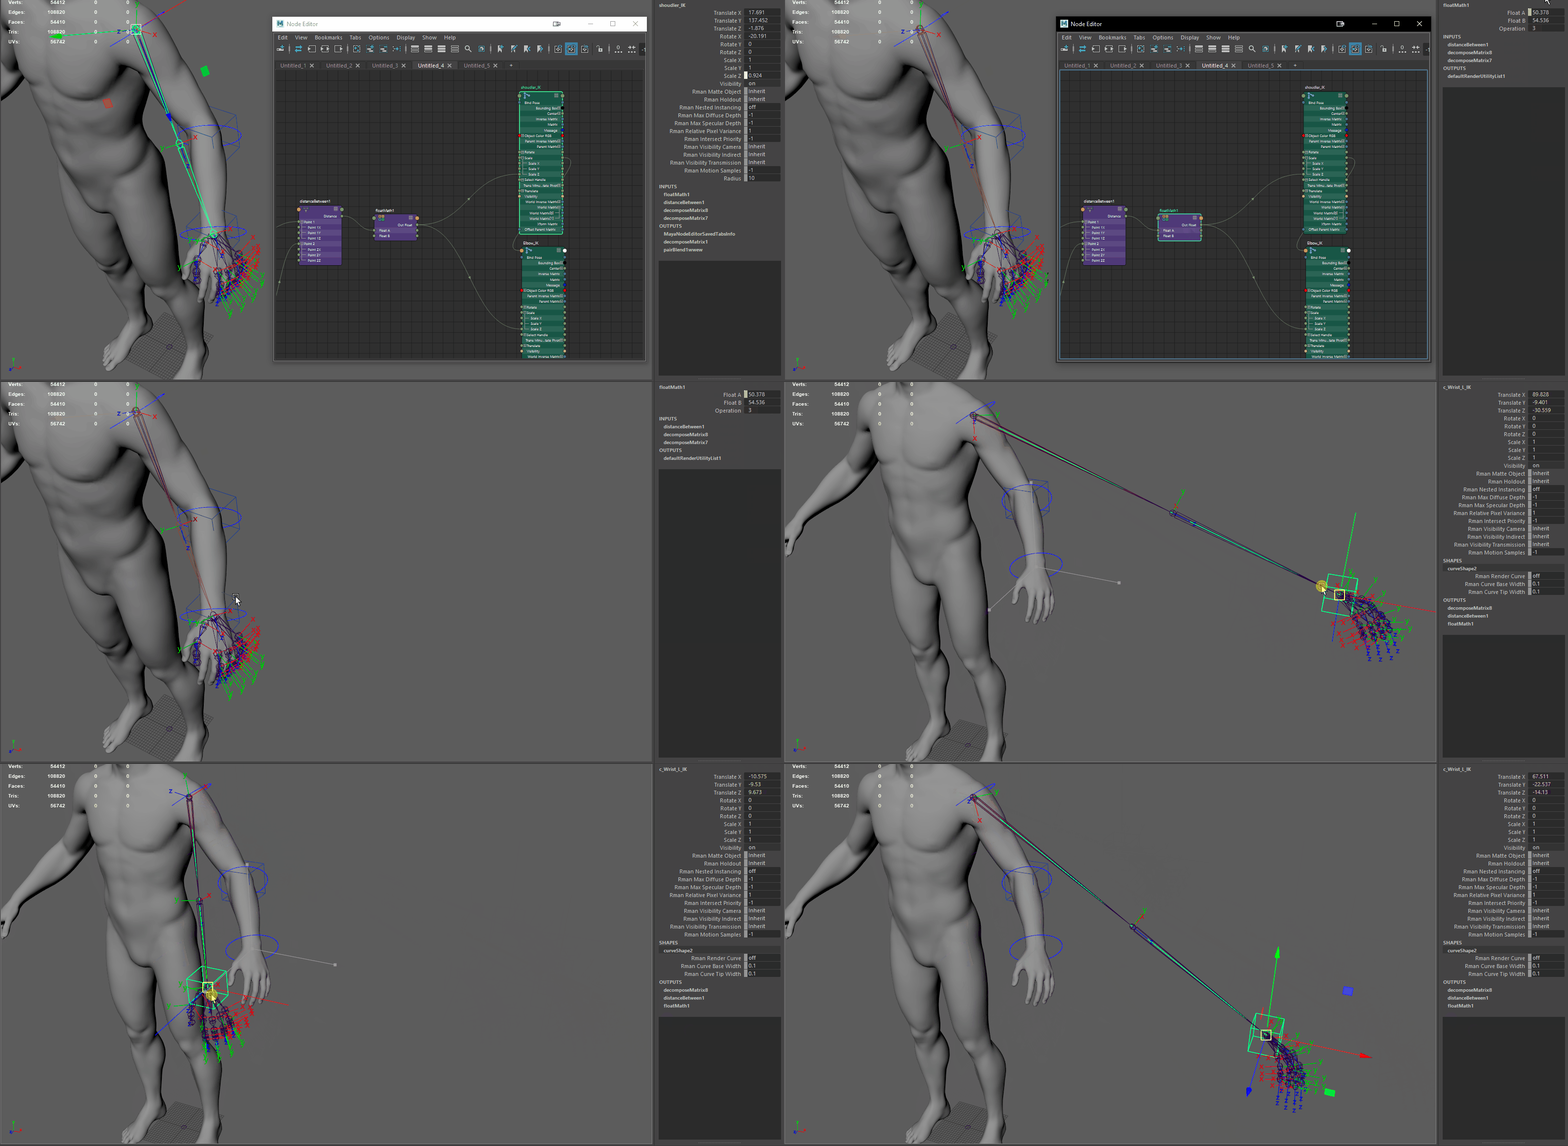
Next, to continue and to have a scaling factor to stretch the arm, we need to use another node called "floatMath". Connect the "distanceBetween" node to the "float A" input of the floatMath node.

The benefit of this mode is that if we change the operation mode to "divide", we will be able to create a multiplication factor for stretching the arm. In branch A, we have the current distance, and in branch B, we will input the maximum distance the arm can extend. This will allow us, from a mathematical perspective, to create this multiplication factor.
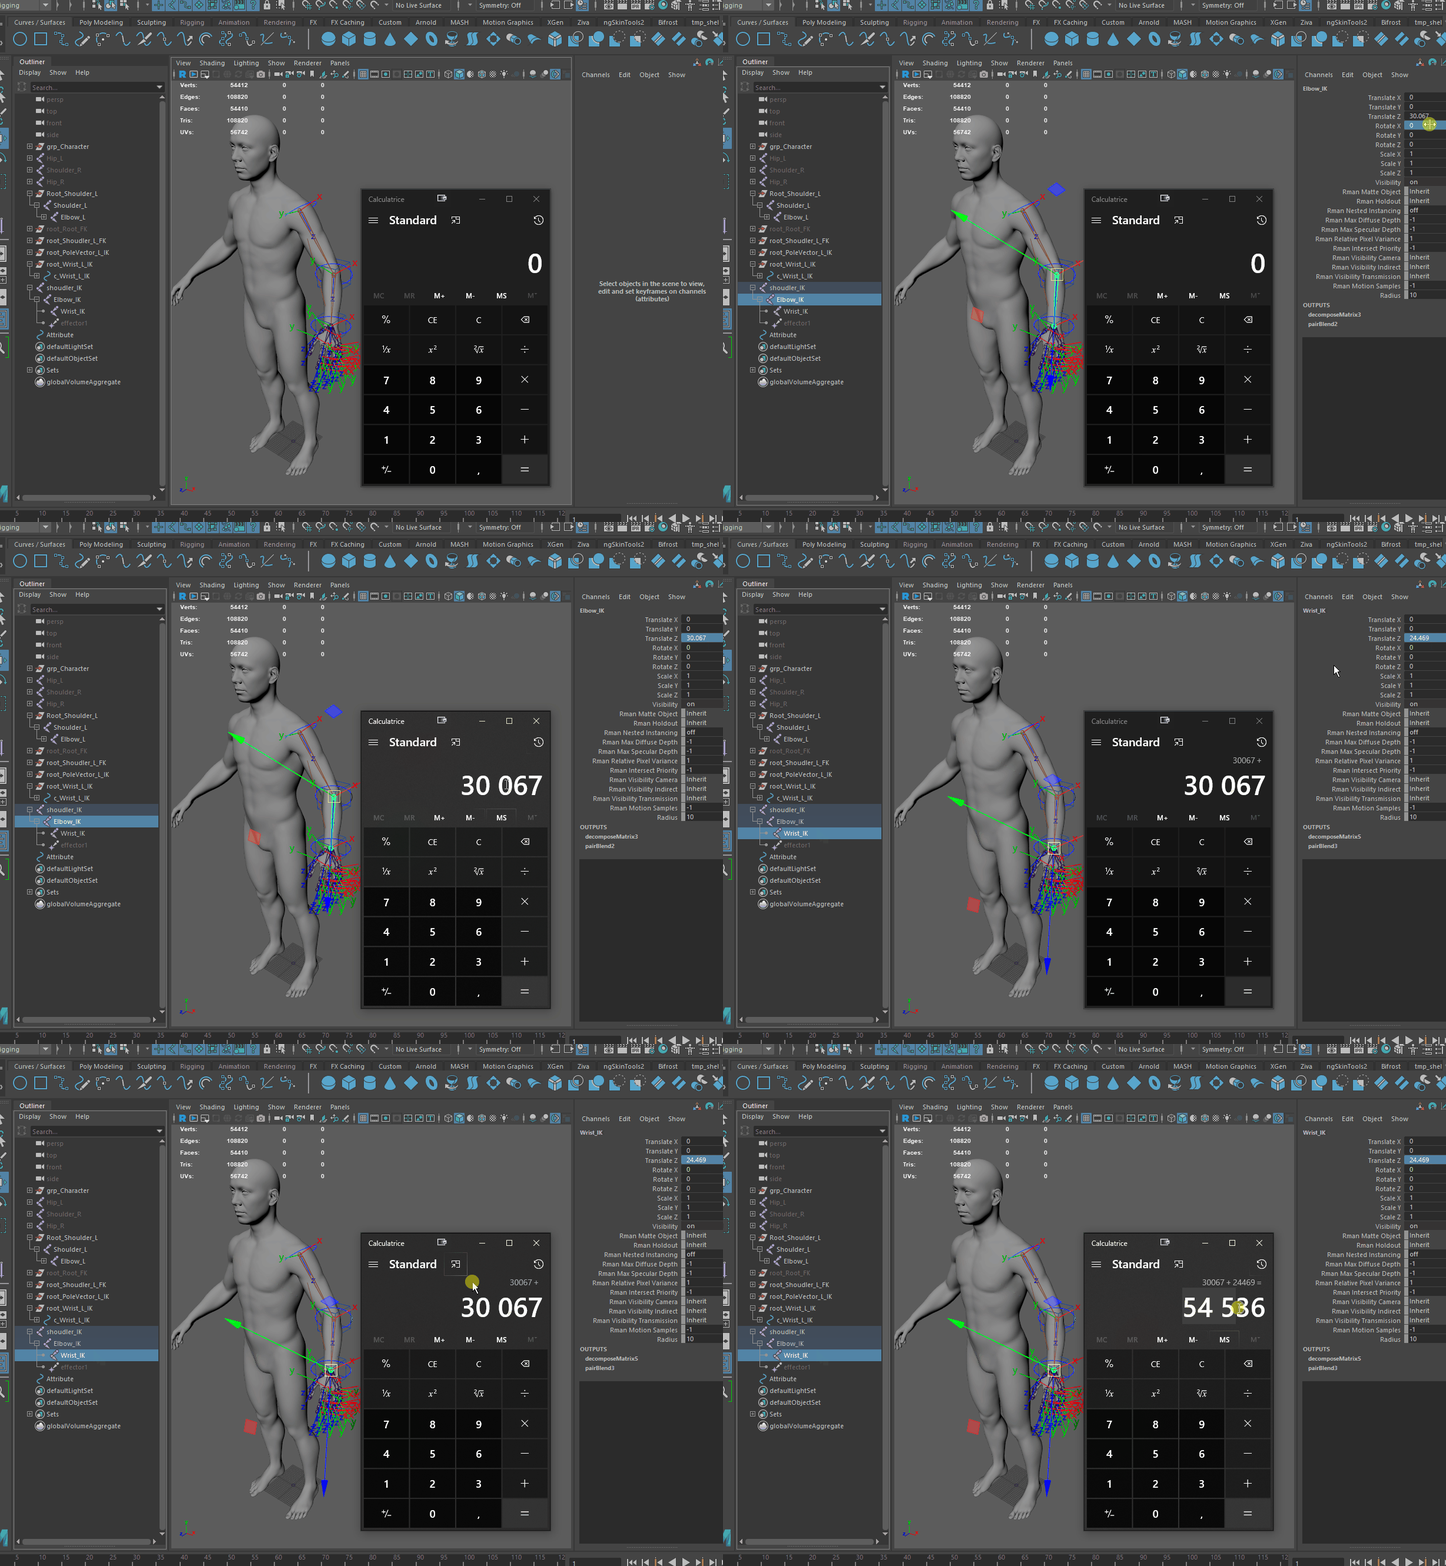
To determine the maximum extension distance of the arm, it's straightforward. Simply retrieve the translations of the elbow_IK and wrist_IK joints, add them together, and you'll have the maximum distance your arm can reach. Then, input this value into float B, and your multiplication factor will be set.
Once this is done, all you need to do is connect your floatMath node to the scaleZ attribute of your elbow IK and shoulder IK. Once this is set up, your arm will be able to stretch infinitely and contract infinitely.
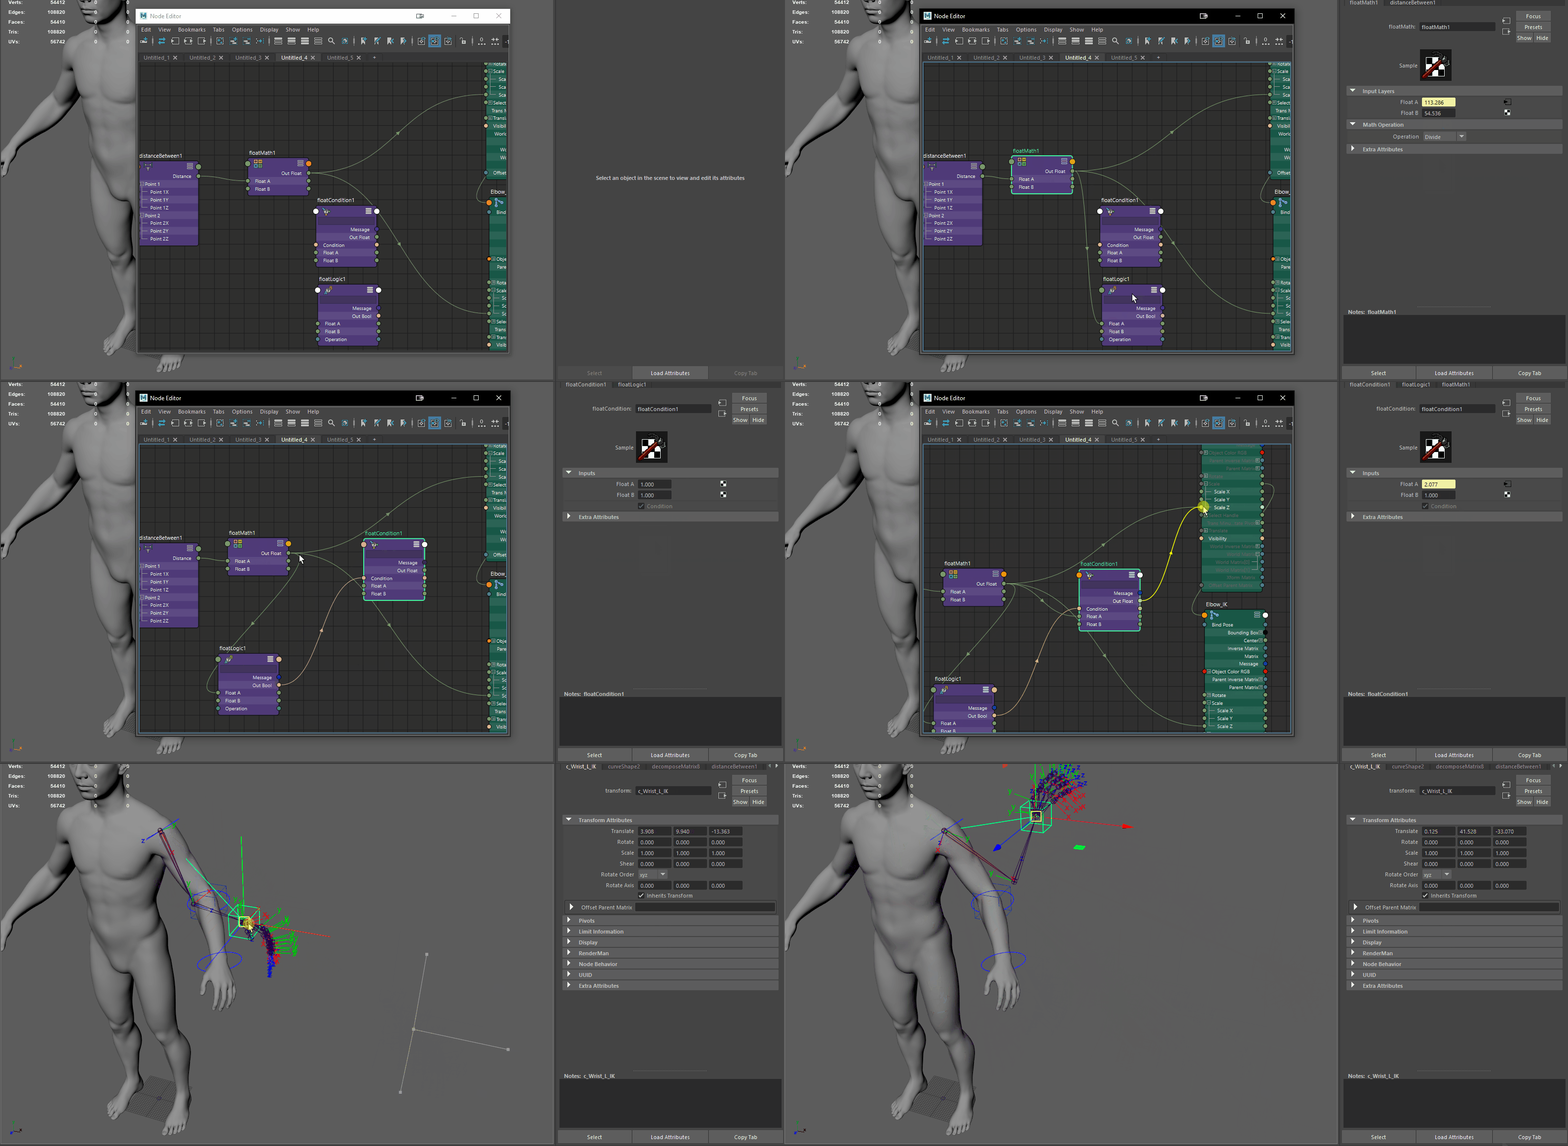
But the current issue is that we don't want the arm to only shrink; we want it to stretch but not shrink. To achieve this, we will use a float condition and a float logic node that will check if the multiplier coefficient is less than 1. If it is less than 1, we will leave it at default to 1, and if the multiplier coefficient is greater than 1, we will use this coefficient in the scale.
We will check if the float math output is greater than 1. If yes, we will use Float A of the float condition, and if it is less than 1, we will use Float B of the float condition.For the connections, you will follow exactly what is shown below the video.
FloatMath.OutFloat -> FloatCondition.FloatA
FloatMath.OutFloat -> FloatLogic.FloatA
FloatLogic.OutBool -> FloatCondition.Condition
FloatConditionFloatB = 1
FloatLogic.FloatB = 1
FloatLogic.Operation = ">"
That concludes the IK FK switch. You can further enhance it by adding attributes that toggle the visibility of IK or FK controls based on your needs. Add a way to choose when the arm stretches or not. You have the possibility to add many options and properties to your arm to suit your requirements.
Once your arm setup is working, the next step is to replicate the same process for the legs and the other arm. Make sure to rename all your controllers and joints so that each has a unique and easily identifiable name.
Create a naming convention that helps you easily navigate through all types of controllers and joints in your outliner. For example, for joints, I name them with the joint name first, followed by the hierarchy type (IK or FK), and then whether it's right or left side.
For controllers, I reverse the last two elements: joint name first, then right or left side, and finally the hierarchy type (IK or FK).
Take your time to understand everything thoroughly, and then you can proceed.
JOINT
CONTROLLER


Once you've completed your entire system, you should have something similar to this. However, you may notice that it's a bit messy in your outliner.

Once you've completed your entire system, you should have something like this. However, you may notice that it's a bit cluttered in your outliner.
To address this, we're going to create some groups to organize and visually structure your hierarchy in the outliner. First, we'll create 4 groups. One for FK joints called "FK", another for IK joints called "IK", a third for controllers called "CTRLS", and finally, we'll nest these 3 groups within a top-level group named "RIG".
Once this is done, we'll start by parenting all original FK joints into the "FK" group, which includes the joints we initially placed at the beginning of the tutorial. Then, for the "IK" group, we'll parent all IK joints into it. Moving to the "CTRLS" group, we'll place all controllers inside it, and within the "CTRLS" group, we'll create two additional groups: one for IK controllers and another for FK controllers.
(Note: Make sure all groups you create are at the world origin with 0 translation, rotation, and scale. This ensures you won't encounter unintended offsets or deformations on your rig.)
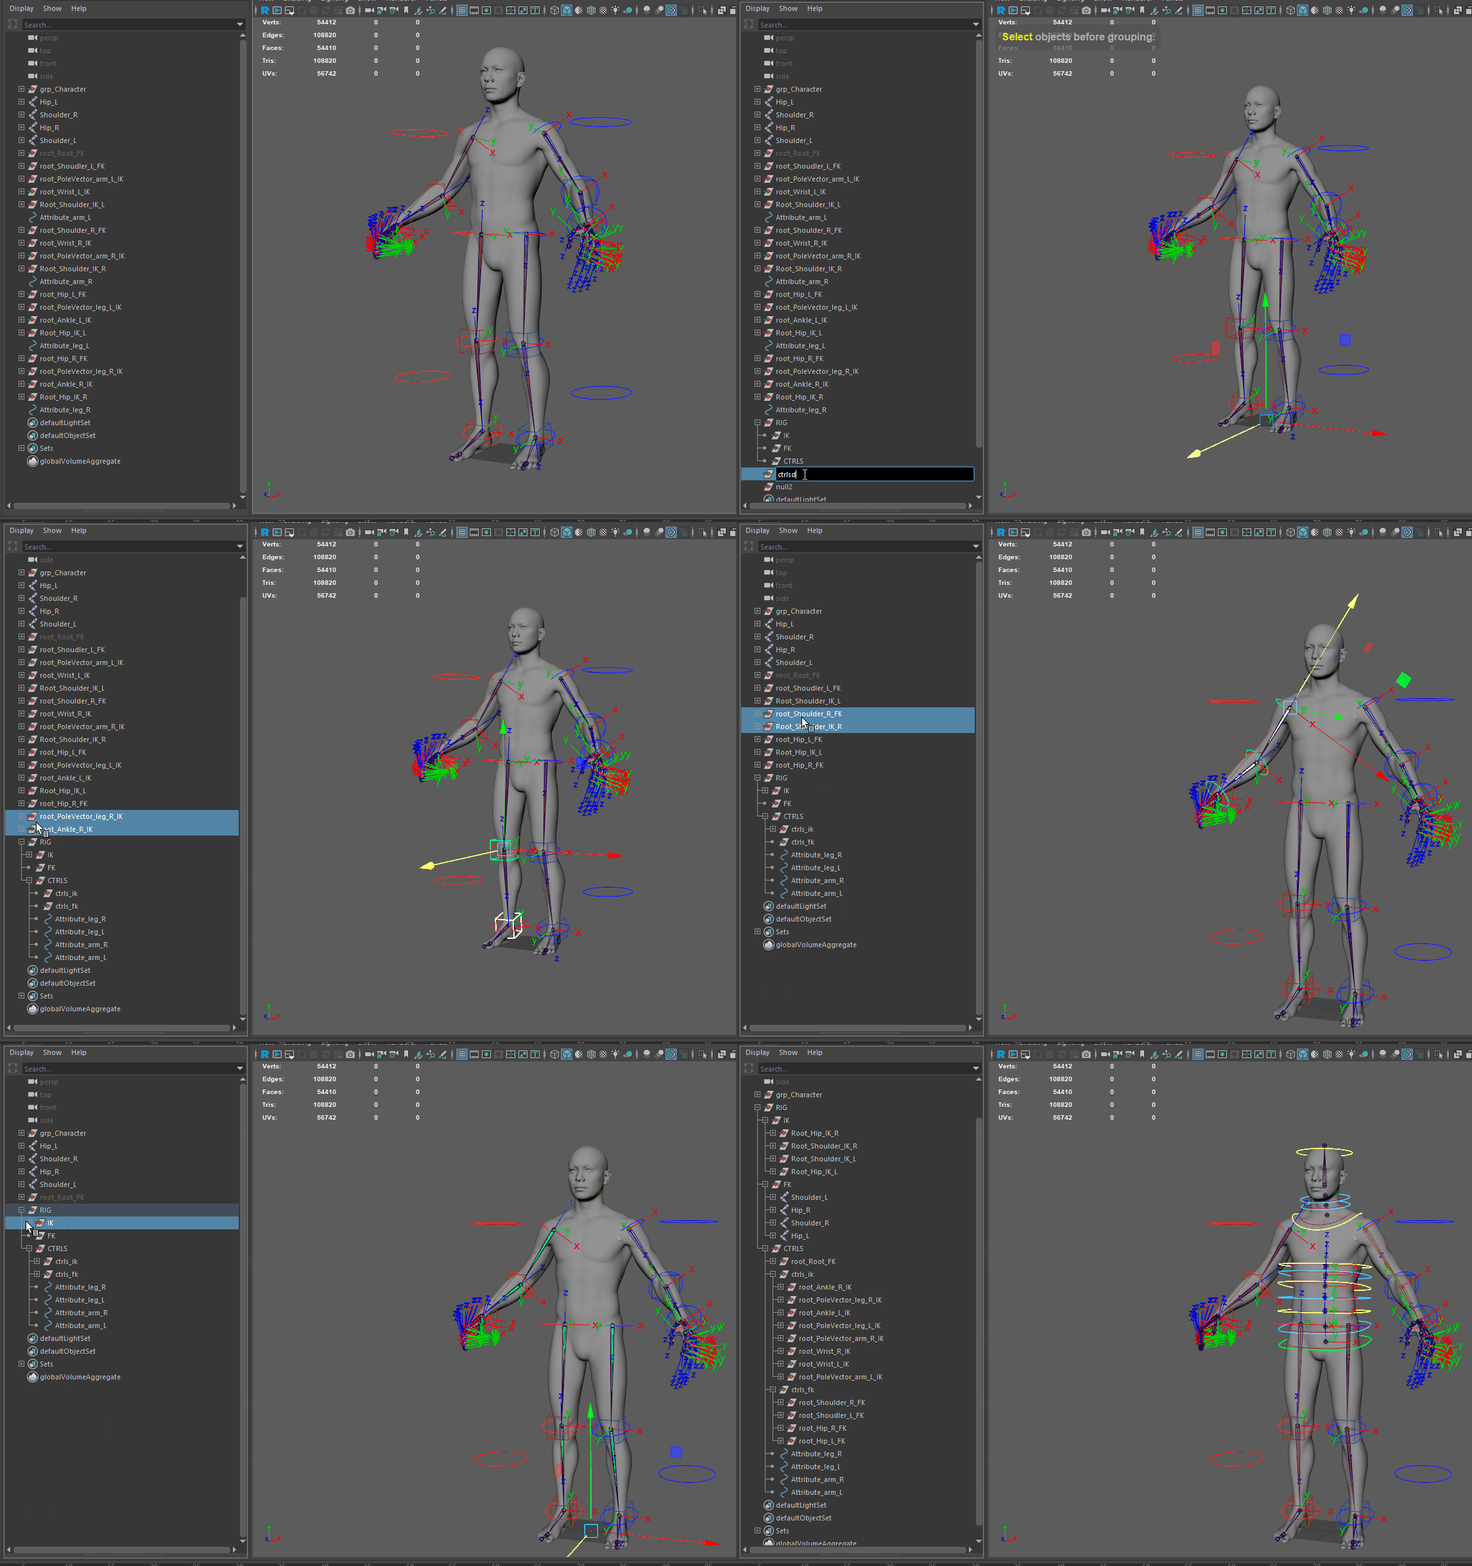
With this technique, you can organize all elements as you wish by creating groups and renaming them appropriately. You can separate controllers by limb or by type of element however you see fit, as long as it's easy to read and easily identifiable for you.
(The "root_Root_FK" group has been separated because if you have a specific hierarchy that mixes IK and FK, we've set it apart for that reason.)
4. Make a basic hand / feet
For hands and feet, we'll keep it very basic as more detailed and in-depth lessons will be covered in future courses. We'll focus on simple movements that can be easily utilized.
Let's start with the hands. It will be quick and efficient. You'll need to create a controller for each joint of the hand. The distal phalanges (the tips of the fingers) may not need controllers as they are primarily there to assist with skinning. Place them using match transform to save time and ensure they have the correct orientation.
For the hierarchy of the controllers, simply follow the same hierarchy as that of the joints in your outliner.

Once you've done this, you'll need to create a group that is constrained to the wrist joint the joint you placed at the beginning, now inside the FK group. By constraining this group to that joint, you'll be able to capture the hand's placements in any situation. Then, you can place all the finger controllers' hierarchy inside this group, ensuring that the controllers follow the finger joints.
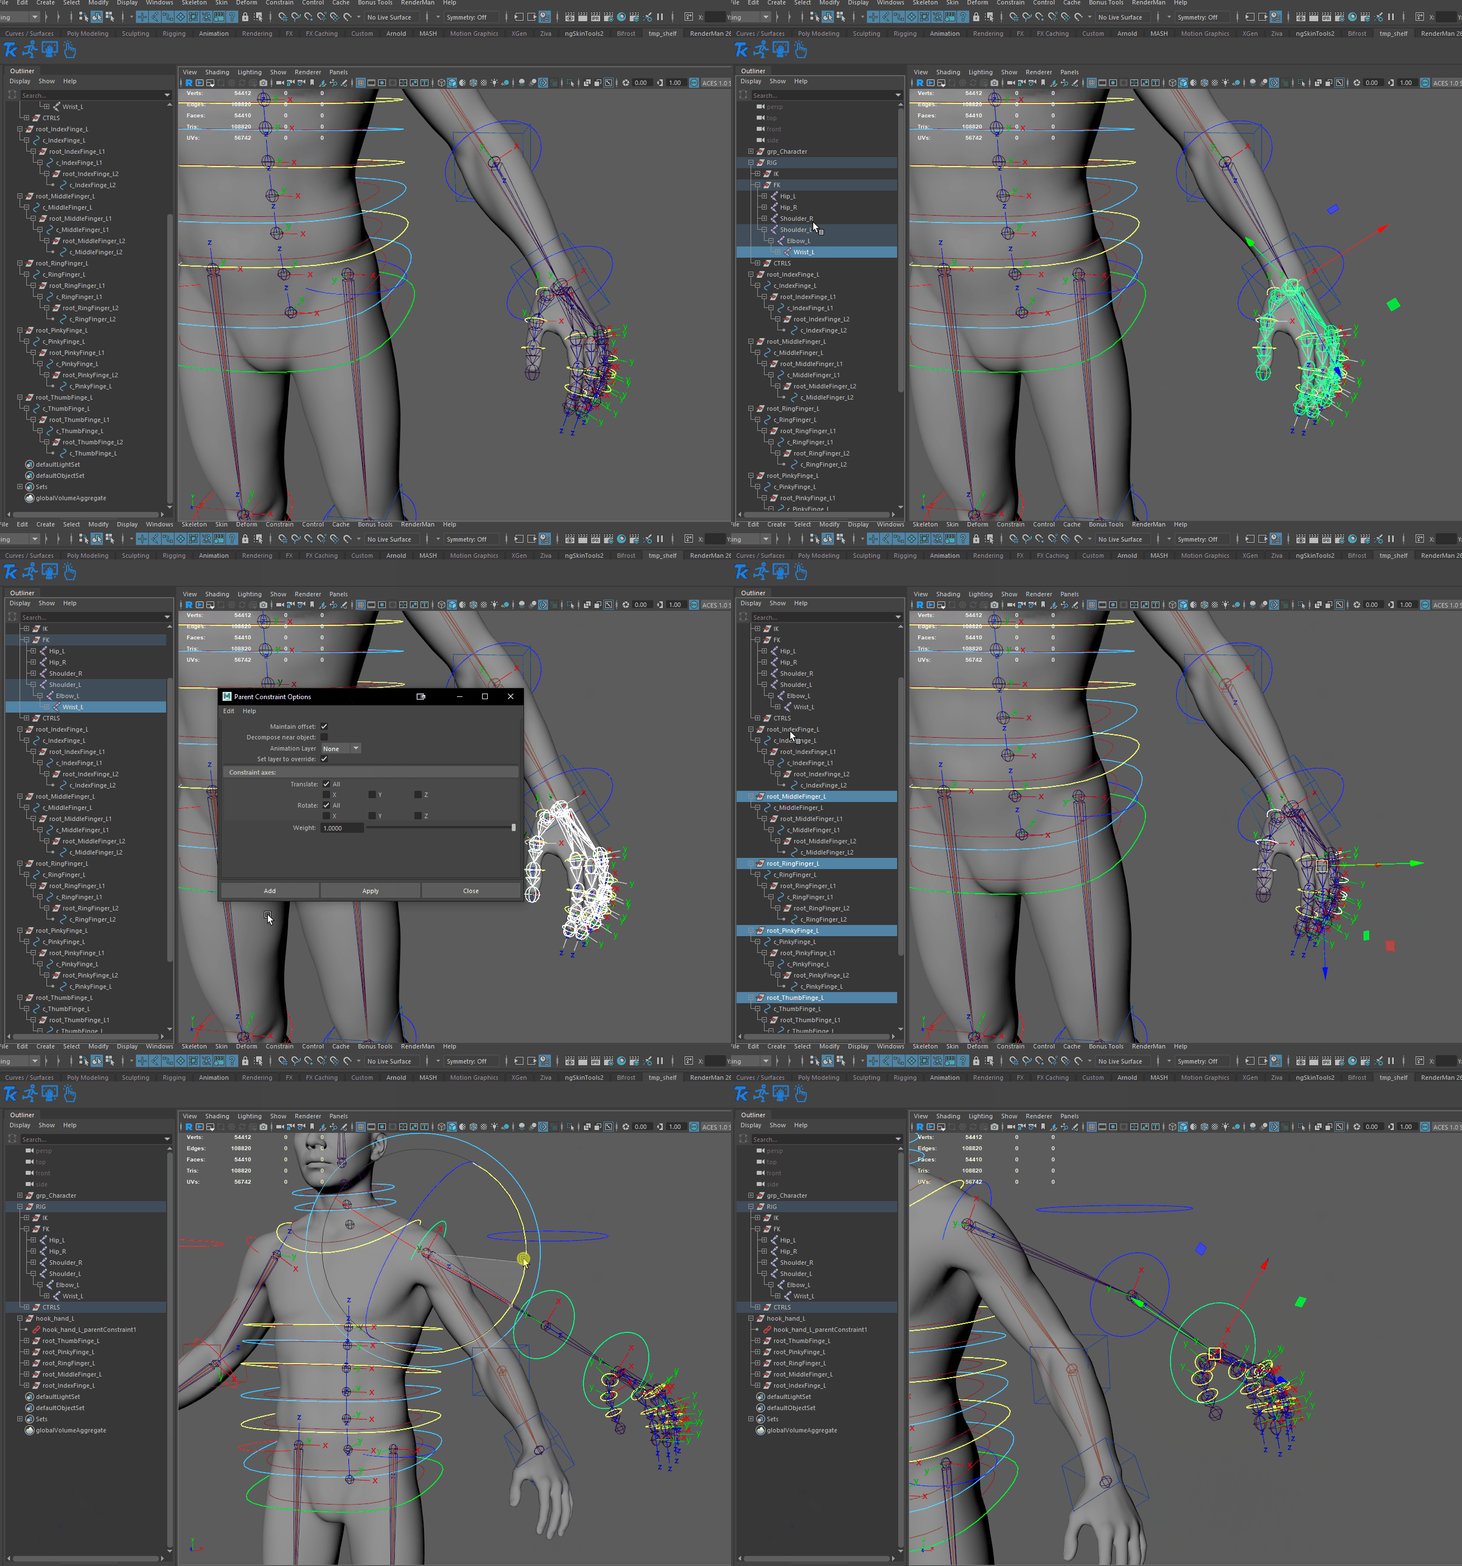
from here, to enable the controllers to move the fingers, we have two options. The first is to use a parenting system similar to what we did with the spine, where we directly place the joints under the controller. This method is efficient in terms of rigging but may not be ideal for clarity when it comes to skinning or other tasks.
Alternatively, the second technique is more complex but offers better control and optimization for the rig. We'll use matrix constraints in Maya, specifically a parent constraint, which will allow us to maintain a clear hierarchy in the outliner while achieving efficient rig performance.
To implement our matrix constraint system, we'll follow a similar process to the pairBlend method, but without using pairBlend itself. Here's how we'll do it:
-
Decompose Matrix: Use a Decompose Matrix node to extract the world position of the controller. Connect the rotation and translation outputs to the corresponding finger joint.
-
World Inverse Matrix: Retrieve the world inverse matrix of the parent of the finger joint we're working on. This inverse matrix ensures that the finger joint follows the controller accurately.
Ensure that the joint orient of all finger joints is zeroed out to ensure perfect finger positioning. This approach using matrix constraints will provide us with precise control over finger movements while maintaining a structured hierarchy in the outliner, making it easier to manage and skin later on.
(Make sure to zero out the joint orient for all joints to ensure perfect finger positioning.)
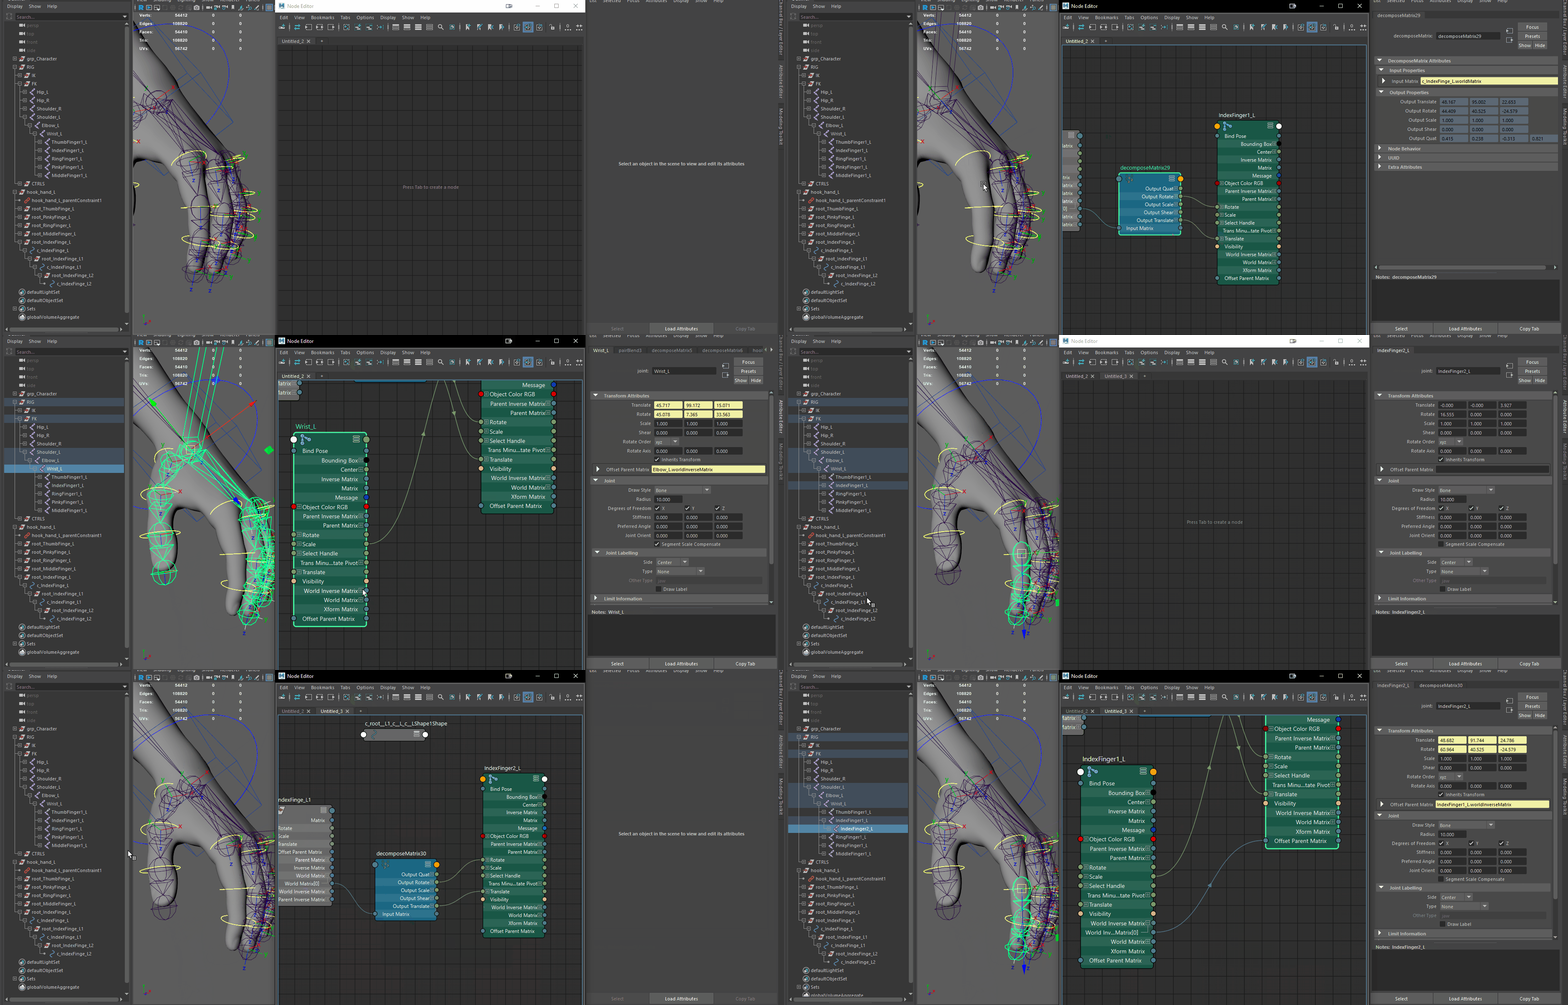
To verify if you have selected the correct parent joint, it's quite simple. There will always be a green connection from the parent (scale) to the child (invert scale). This green connection confirms that these joints have a parent-child hierarchy, ensuring that the joint is indeed the parent.
You just need to make these connections for all the phalanges of your hand. After that, do the same for the right hand, and then your hands will be usable.
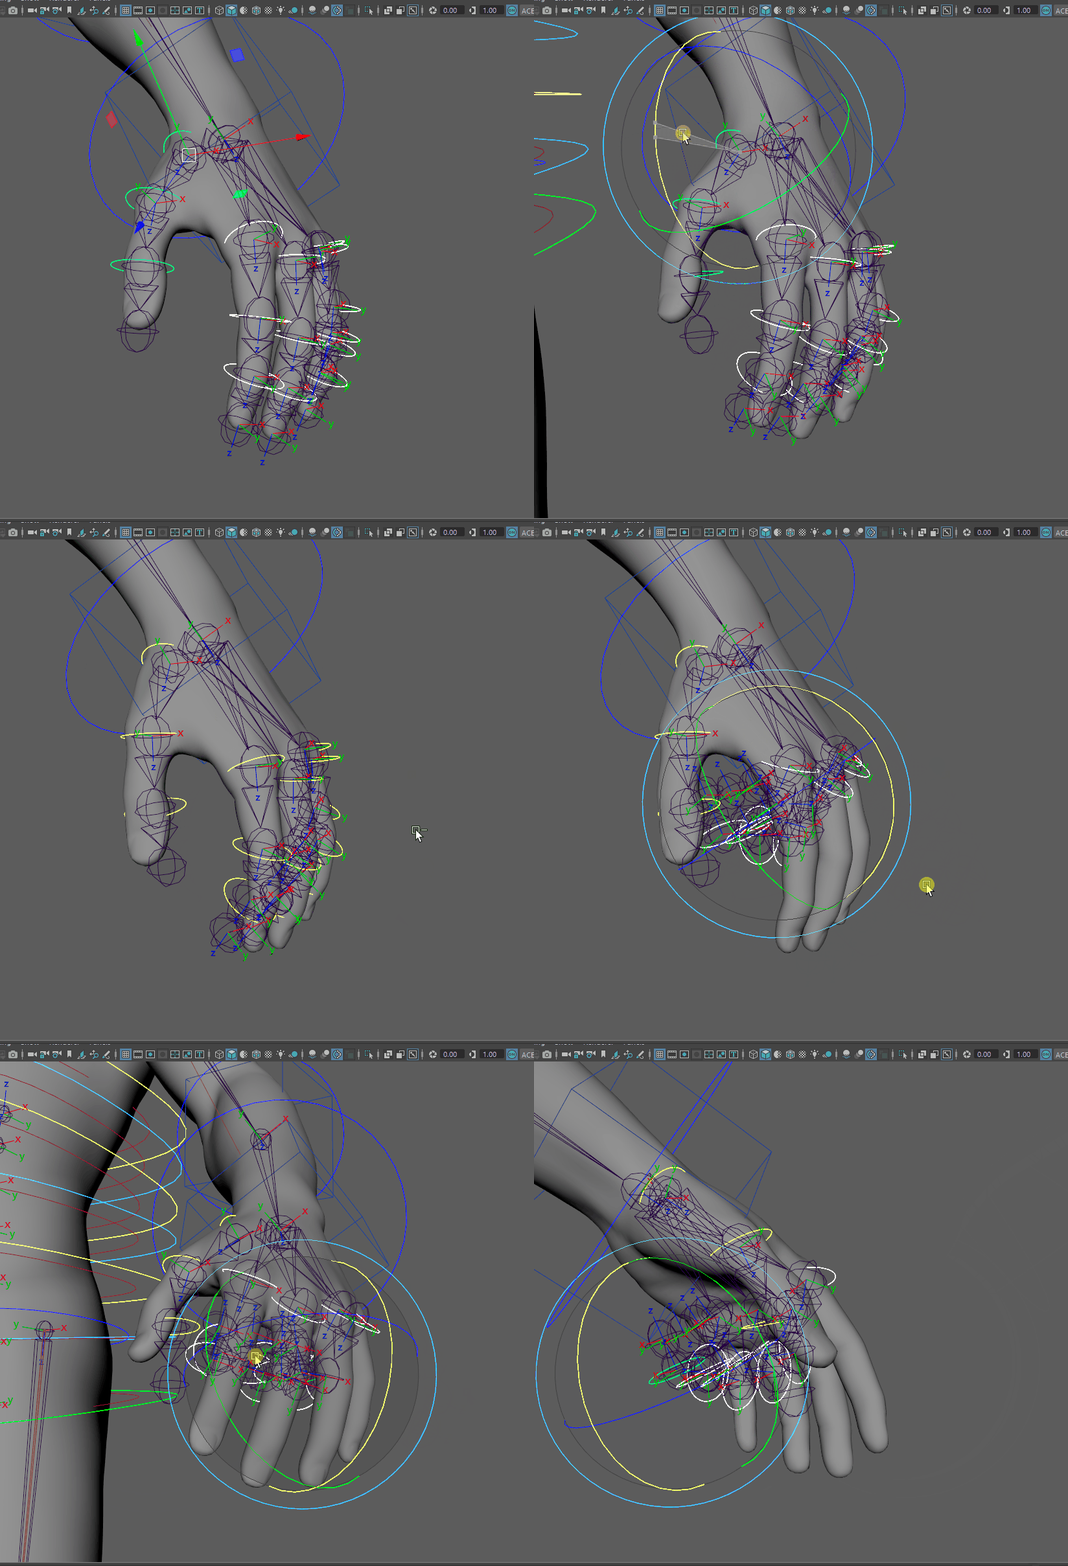
For the foot, it will be very simple because there is only one controller to position, which is for the toes.
We'll stick to the same technique: create a controller using match transform, then create a group and parent it to the ankle. After that, we'll establish the connection using matrix constraint from the controller to the joint. Example in the video just below.
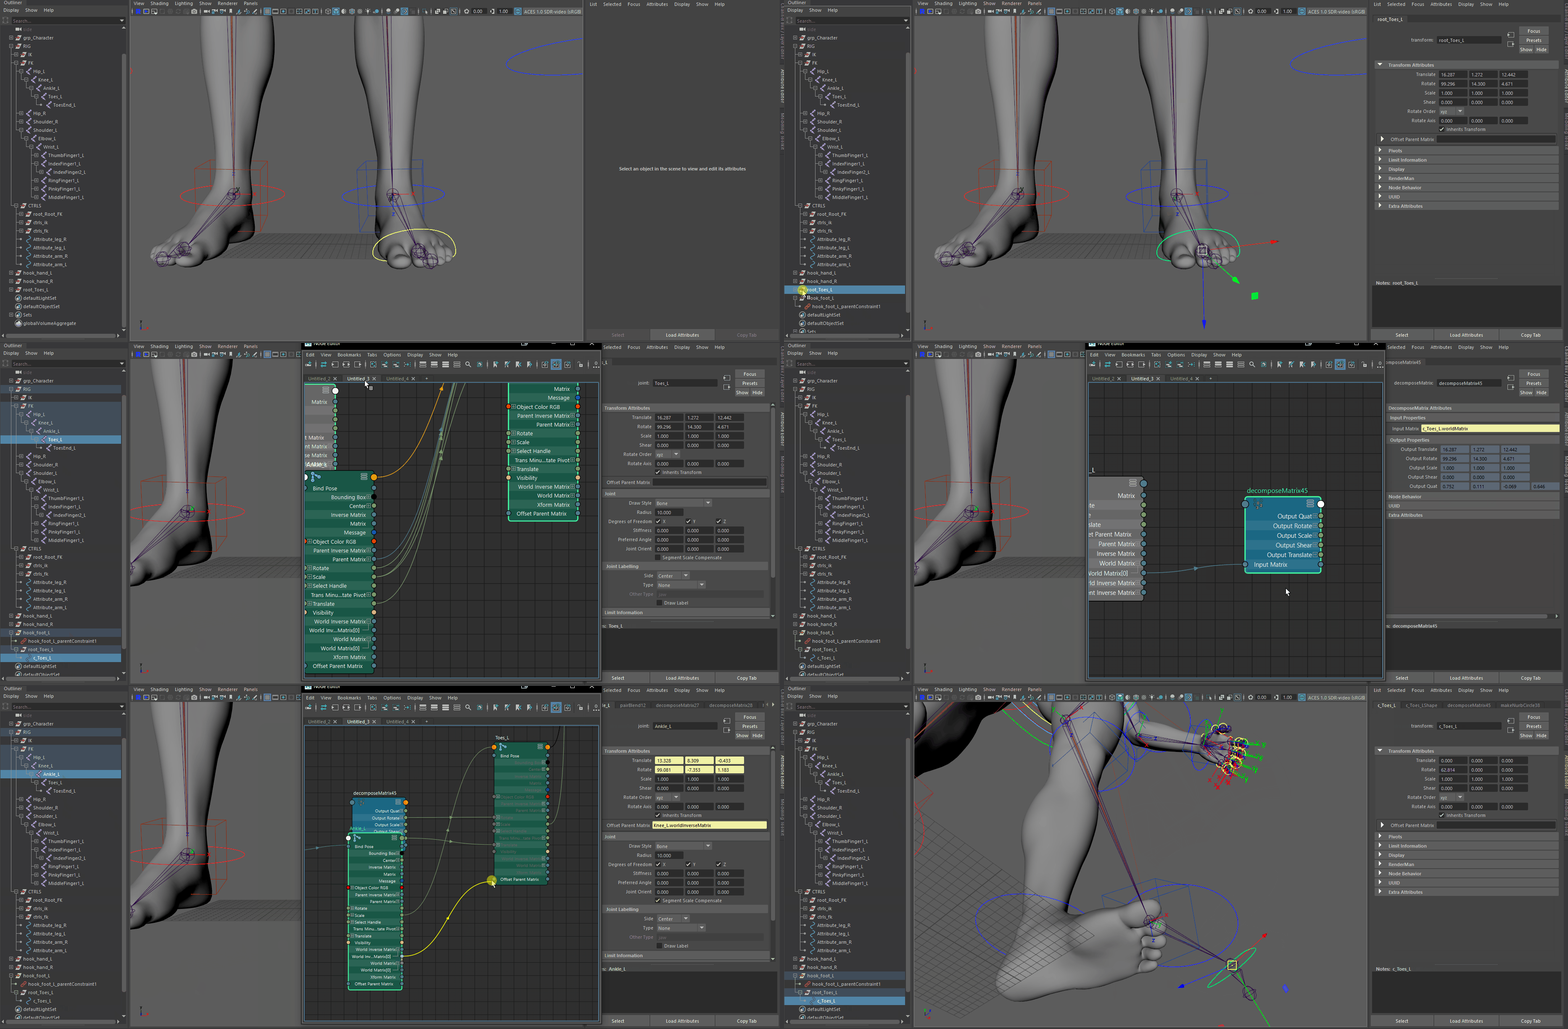
There you go, you just have to do the same thing for the other foot and you'll be all set. In future courses, we'll learn how to create a much more advanced system for the hands and feet.
5. Link everthink
Here we are at the final step, which is actually quite straightforward as long as you've followed everything correctly up to this point. This step involves bringing everything together so that when we move the body, the arms and hands follow perfectly, allowing our character to be animated.
This step is relatively simple because it involves creating parent constraints or small Maya constraints.
First step, to constrain the legs to the body, you'll need to create constraints between the "c_Root_IK", the spine controller, and the roots of the IK joint hierarchies and FK control hierarchies of your legs.
for the FK hierarchy

for the IK hierarchy

Do the same for the other leg and the legs will be finished. From there, the legs will follow in any situation. Now, to constrain the arms, you will need to create two controllers that will allow you to move the clavicles.
To place them, it's simple: you'll need to follow exactly the same process we discussed at the beginning of the class regarding joint placements. To position the clavicles, we will draw a line between the shoulder joint and the exact center of your rib cage, draw a straight line, and place it at approximately 1/5 ~ 2/5 distance.


Once these two controllers are created, you will need to parent them to the "c_chest_FK" controller like this

And the final step will be to do the same thing we did above for the legs, which is to constrain the hierarchies' routes.
For this, you will need to create constraints between the left clavicle and the roots of the hierarchies of the IK joint and FK controller of your left arm respectively.
Use "c_clavicle_L" for the left IK joint hierarchy and left FK controller.
Similarly, use "c_clavicle_R" for the right IK joint hierarchy and right FK controller.
for the FK hierarchy

for the IK hierarchy

After doing this for the arms, legs, and body, I can confirm that you have completed rigging your character. From this point on, your entire rig is unified and functions as a whole.
You can move each part of your character, and everything will follow seamlessly. If you encounter any bugs, double-check the lesson and ensure you haven't mistaken the orientation of anything or made any mistakes in your constraints.
6. Which joint should I Skinner
To answer this question, it's quite simple: all the joints that we will use for skinning will be located in the FK group. These joints will be used to skin our character.


If you have followed the course perfectly, you should find a total of 70 joints to skin. I recommend that you create a set afterward, which will allow you to easily select the joints for skinning.
And for everything related to the spine, you will need to select all the joints located in the IKFK hybrid hierarchy.

To create a set in Maya, it's an element that allows you to group elements together to execute actions later or to select them easily.

Great, we have just one step left: select these joints, then select your model, and create your skin using a maximum of three influences. Once this is done, I recommend revisiting my first lesson on rigging, which explains the method for skinning your joints.
Afterwards, we can hide the IK group. This group won't be used for skinning; it's only there to help us calculate the arm positions in IK mode.
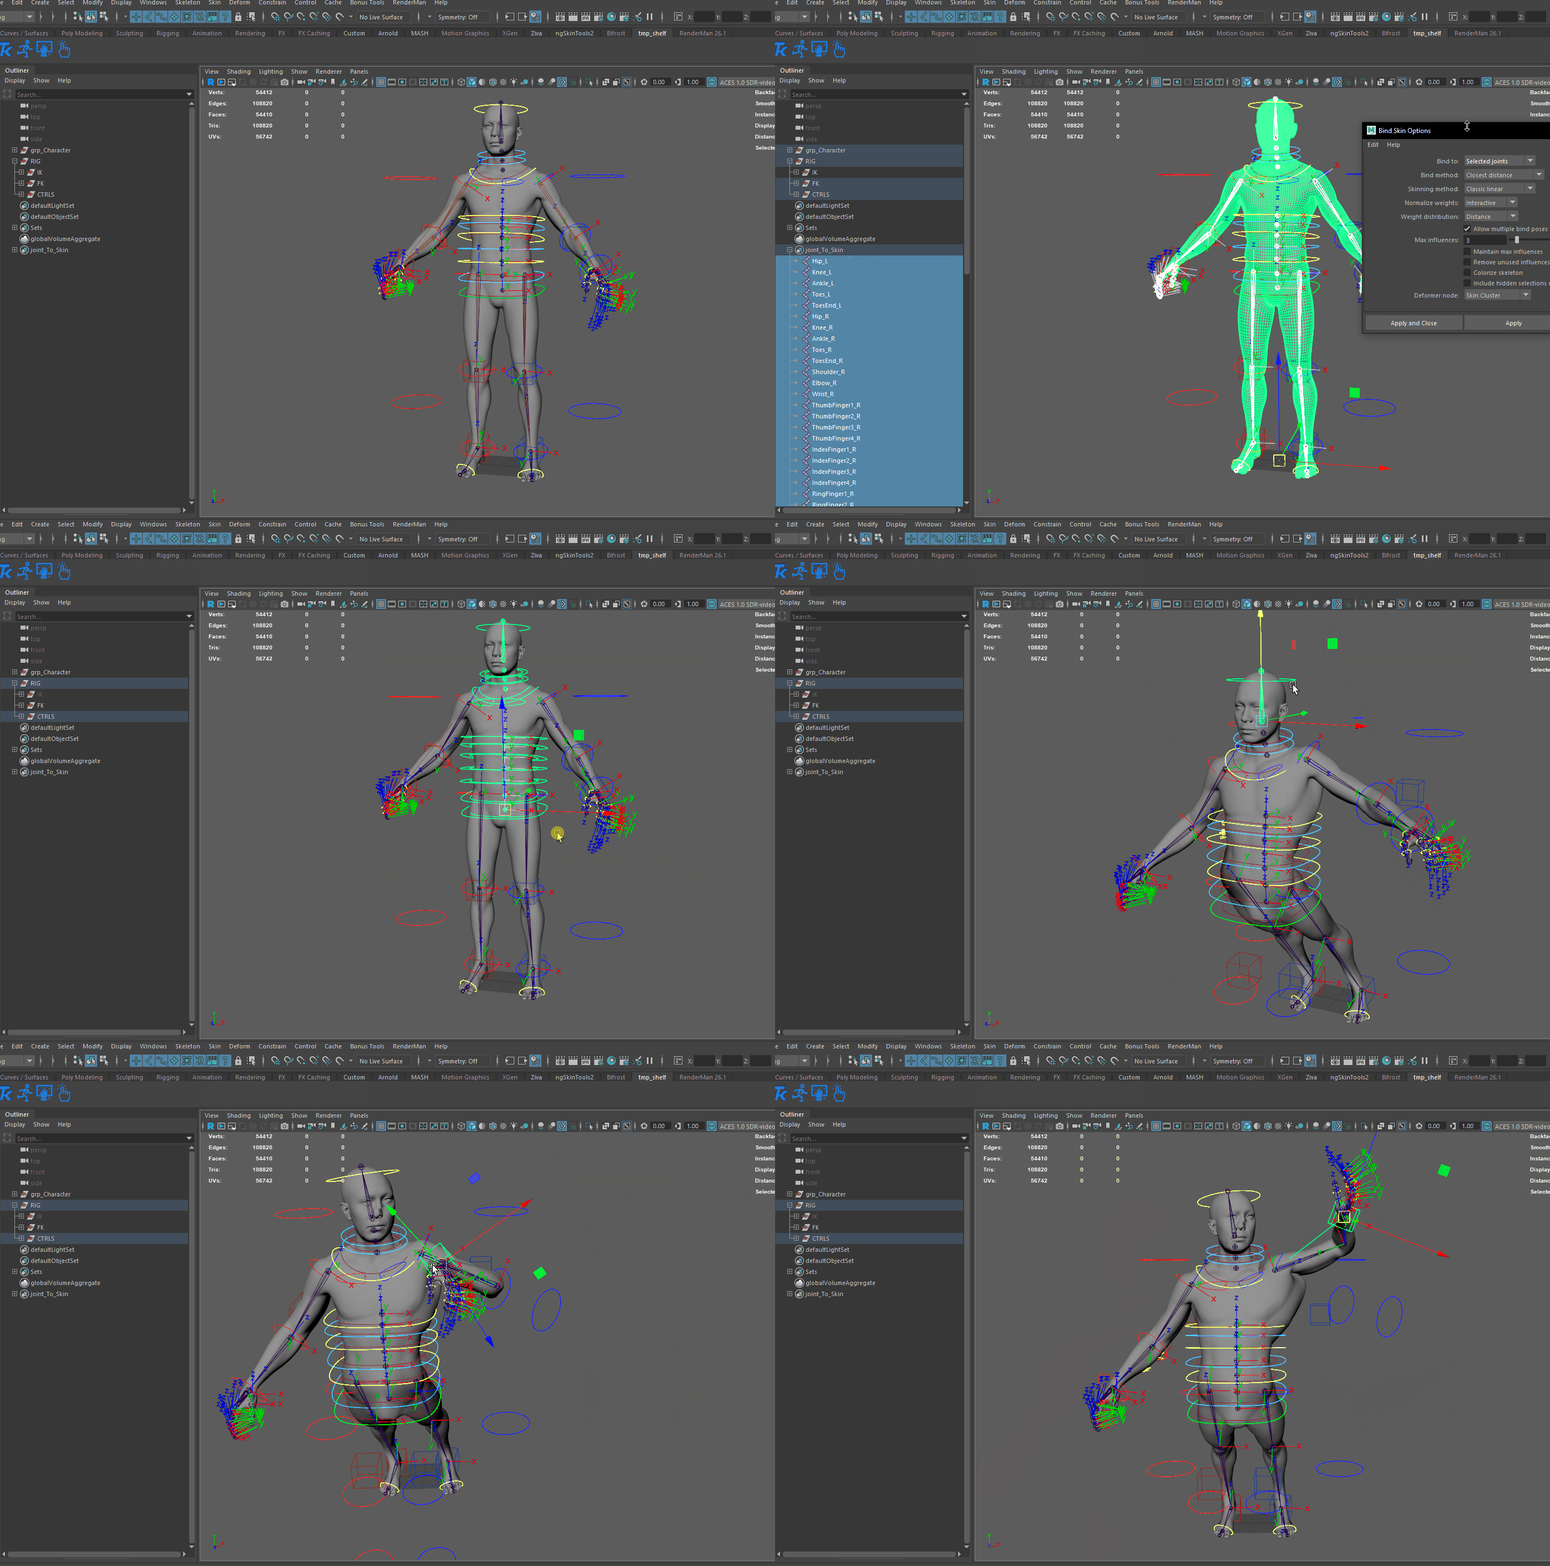
Attention, this is Maya's default skinning, no skin adjustments have been made.
Of course, this course is here to guide you through the initial steps of creating a humanoid rig. In future lessons, we will expand on this character and rig to add more depth.Ultimately, the goal is to make this character usable in any situation.
In upcoming lessons, we will learn to create ribbon systems to deform the arms into curve shapes, creating much more dynamic rigs. This will enable animators to create shapes that are not feasible in reality.
We'll also have lessons dedicated to hands and feet to make them easier to animate, allowing animators to save time during animation.
Additionally, there will be a focus on limbs to maximize the potential of arms and legs, making them highly flexible.
I hope this lesson has served you well !

