Ragnar
Create a character from your imagination and bring it to life.
Introduction
The idea for this project came from the desire to give life to a character that would come from our imagination. Inspired by How to train dragon, God of War and The Sea beast character design, we gave life to Ragnar, warrior of the Baldur clan and son of the chief of his tribe. So the goal was to create a character with a strong personality, destined one day to become the leader of his clan. But Ragnar is about to face painful events that will change him forever.


Backgrounds by Dreamworks Animation
Pre Production
References
The main references were Drago from How to train dragon 2, the villain of the second part, who has a lot of character in his shape and is very caricatured and the captain of The Sea Beast from Netflix. We also took a close look at the realistic-textured, cartoon-shaped characters, as we wanted to go for this lookdev style.

The garments is inspired by real Viking outfits, made by themselves in a very traditional way. Our costume is closer to Thor's in the God of War game. This kind of suit gives him more freedom of movement and is better suited to his body type.


Production
Modeling in Zbrush and Maya
To begin production, we created a number of different sculpts until we found an overall shape that suited us. Then we began to refine her silhouette and give her character. We had some sketches we'd made to research the character's design. The first step in modeling was to sculpt the character's shape on Zbrush, and once we had a shape we liked, we could export it (in OBJ) for retopology in Maya.

References modeling :


We need to have more density in the face to have nice deformation in the rig and respect the topology structure with good edge loops.

Once the topology has been created on the live obj below using maya's quad draw. We can move on to the perfectionist phase. When doing the topology, we often lose volume or the shapes aren't necessarily as we'd like them to be, so we go to Zbrush to slightly reshape the volume of the character just with the move tool.


Final Shape for the body
For the clothes, the references were mostly outfits from God of wars and typical viking outfits. the clothes were made in maya using planar and cube. to ensure that certain pieces fit his body perfectly, we duplicated his face and extruded and built the model from the perfect base.

The costume had to be simplified to fit the cartoon style of the character. to personalize it, we added a necklace representing the emblem of its clan. ragnar is a warrior, son of the chief of his tribe, with great responsibility resting on his shoulders. We had to feel it in his costume, which is very noble and rich.


Here are Ragnar's final modeling renderings with Occlusion and Vizualizer to Renderman :

Renderman render : Dome light (Annecy) + Rectangle Light ( key light)

Rig a cartoon shape
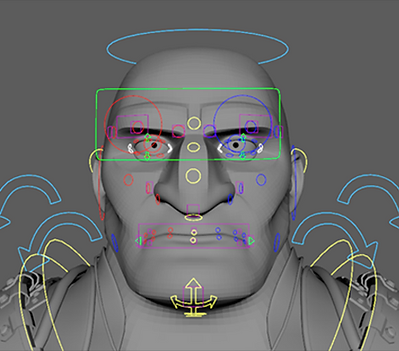
Malleable rig, using IK, FK, and hybrid hierarchies, capable of performing any type of animation and any desired movement. Each piece of the armor is independently controllable from the character to maximize deformation adjustments. Additionally, each body part can be twisted as needed.


As for the facial part, everything was done using blendshapes. A multitude of blendshapes were created to achieve all the primary deformations of the face, which were then combined to create all sorts of possible expressions using a tool called BCS (BlendShape Combination System). This tool allows for a much more natural and logical combination of blendshapes than Maya's. Thanks to BCS, we only need to create a controller that will drive each shape we want in order to animate the character in the end.


By combining all the different blendshapes, we can create all sorts of facial expressions using the primary linear blendshapes. The advantage of working with blendshapes is that they allow deformations that mimic what a muscle would do, or even exaggerate deformations to an extent that would be extremely difficult to achieve with joints. Additionally, the advantage of using BCS is that it allows you to adjust the symmetry placement of the shapes and manage the transitions between them as you wish, offering an incredible level of adaptability.
Maya Viewport / Facial Expressions


Render / Rig Posing:
Output Nuke

RAW Render

Rig Posing

Grooming and CFX Houdini
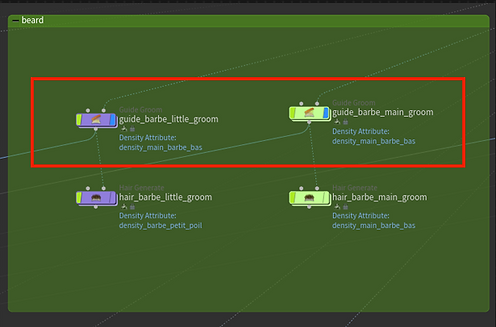
For groom and cfx, we've created set-ups. For the groom, we first had to create the guides and shape them with the groom guide node. Then we had to generate the hairgen and create the shape of the hairs we wanted. There are more than 30 descriptions in all. The idea was to create a general description and then complete it with two other descriptions (medium hair and small hair) for a realistic result.

Here are Ragnar's guides :


The groom guide node can be used to brush, cut, lengthen and much more, a valuable time-saving node. Draw curve will allow you to draw curves that will orientate the guides, a good way to get them going in the right direction.
Here are Ragnar's Hair Generate :

In node hair gen we can manage a lot of parameters, especially with attributes and masks.


Work in progress Hair :

Hair Generate 1

Hair Generate 1 2 3

Hair Generate 1 2 3 4
Workflow with density masks :

This node is the source of the groom, it contains all the masks for each description, each parameter that needs a specific zone is stored here.


Export and Id
For export, it's important to set the id (individualized for each hair for shading).


In the color node, it is important to define the id attribute in the group type: primitives so that it works when exported.
CFX Set up

CFX Set up includes 3 parts
- the import of the animation alembic or character pose, in the alembic archive and a geo node with an import of the publish character that you use by default for grooming.
- the deform guides, which calculate the groom in relation to the alembic.
- the final hair generate, source of the groomThe export is alembic.
Texturing, Lookdev and Lighting
The Ragnar skin texture was made on Mari and the harder surface garments on Subtance Painter. We created smart materials by hand so that the settings would be just the way we wanted them. Then the shading was done in Renderman, using pxr texture and layer.
What's very useful with Mari is that you can create very high quality textures here it's 4k export.
Texturing skin in Mari

Texturing skin in the material node : Material node allows you to create your own texture by hand, here material 1 corresponds to the skin and my color part to the albedo. The skin textures for the albedo come from Texture XYZ, they have been simplified in Photoshop to match the realistic cartoon style, with a little less detail than originally.


Shading skin in Renderman, Pixar Texture :


It takes a while in shading to find the right values, but once you've done that with all the connected textures, the result is cool. In pxr texture we plug in Diffuse color, SSS, Roughness, Normal map and Displace.
We can play with the values of each map if the result doesn't suit us, an HSL for RGB maps and a Remap for black and white maps, for example. This intermediate grading node is very useful for finding perfect values.
Final Lookdev and HDRI Tests

Post Production
Compositing Nuke
For compositing, we used a self-made template that you can download FREE on the shop. It lets you mix several beauties and apply post-production effects with ease. The process was quite simple the AOVs issued were the classic ones (direct diffuse direct spec sss indirect spec indirect diffuses, transmissive glass lob and transmissive single scatter), so 7 AOVs.
Renderman AOVs :


Here is the different AOVs, With roto and correct grade and color we set the beauty we want with adjustment. Template explication :


We hope you enjoy this breakdown !
Credits
This project was very rewarding from start to finish. Thanks to Vincent Hebrard, Enzo Cransac and Romain Paillet for their feedback and help.
Margot BRUN and Frederic Dewit.
Sotfwares : Maya, Photoshop, Substance Painter, Mari Foundry, Houdini, Renderman, Nuke

